|
|
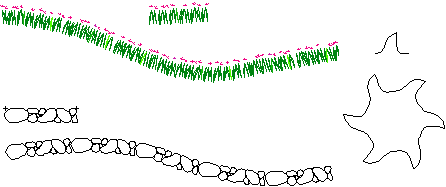
The tool has a wide range of possible uses, such as brick edging, flagstone walkways, rock walls, wavy lines, gear teeth, roller chain, decorative borders, rope, guitar inlay, shrubbery, or even grass with flowers sprinkled in there.
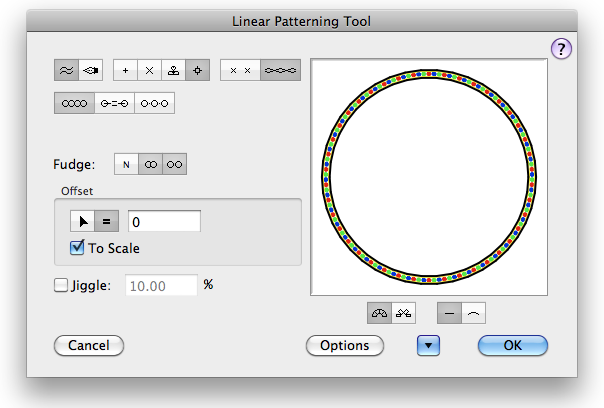
In the tool's dialog, choose what to place. The choices are Points, Markers, Rubber Stamp and Symbols. Markers means the currently selected choice of the Marker tool. Rubber Stamp means the currently adopted object of the Rubber Stamp tool. If the Rubber Stamp tool's private clipboard is 'empty' or if no PowerCADD Symbol library is currently open, an 'unhappy face' will be used in place of the object in the sample window in the dialog box.
Choose objects-on-path to have the objects placed individually along the path and rotated as required.
Choose Ribboning to have the objects distributed or stretched (see fan distortion below) along the path so that they form a continuous pattern. With Ribboning, any group structure will be destroyed, and the objects will be placed as individual objects, a single group or hatching, depending on your choice in the Linear Patterning Options dialog.
Choose End-to-End spacing to have the objects placed adjacent to each other along the path, according to the width of the object. In this case, you have the additional Fudge choices of no fudging, overlap fudging and spaced-apart fudging. You may select one or both types of fudging. With fudging, if the objects don't fully fill up the length of the path, they will be distributed slightly so that they do fill up the length. If you choose both overlap and spaced-apart fudging, the tool will choose the option that would be the closest to the desired end-to-end spacing.
Choose Fixed Spacing to have the objects placed a specified distance from object center to object center. In this choice, you type the spacing, and you also have the fudge choices again. Depending on your spacing, the objects may be separated from each other, or they may overlap. In this case, you may choose fudge to have the objects distributed evenly and as close as possible to the specified spacing. If the tool 'knows about' an object to place (no 'unhappy face') then you will have a number of nudge buttons as well. Choose the '<<' and '>>' buttons to nudge the spacing up or down by 10% of the size of the object. Choose the '<' and '>' buttons to nudge the spacing up or down by the Nudge amount you set in the PowerCADD Preferences dialog. Click on the Reset button to reset the spacing to the width of the object.
Choose Distribute to have the objects distributed evenly along the path. Type the number of objects.
Choose this option to place a single object along the path with the mouse. Because objects can be rotated to the angle of the path, this gives you the ability to place an object tangent to any curve. Choose if the offset will be interactive (arrow) or to a fixed dimension (equal sign). If the objects are to be directly on the path, then the choice would be a fixed offset of zero length. Type the offset that will be used for a fixed offset. The standard PowerCADD math functions and mixed dimensional units may be used. If the To Scale option is selected, the offset will be to the drawing scale. If To Scale is not selected, the offset will be an on-paper length. Choose if you want to jiggle the objects. This means the objects would be moved in random amounts and angles relative to their size. This is intended for stippling or for placing shrubbery. Choose no rotation if you want the objects distributed along the path but not rotated. Choose random rotation if you want the objects rotated at random angles. This is intended for bushes and shrubbery. Choose rotation if you want the objects rotated perpendicular to the path. Choose fan distortion if you want objects stretched in a fan-like manner around curves in ribboning. Choose no distortion if you want objects to be placed individually in ribboning-typically you don't want bricks or tiles to distort. Choose straight or curved lines to be used with ribboning and fan distortion. If you choose straight lines, then lines, rectangles and polygons will retain their straight-line segments as they are distorted along the path. If you choose curved lines, then lines, rectangles and polygons will be converted to Béziers so that the straight-line segments will bend as they are distorted along the path. With very complex Rubber Stamp or Symbol objects, the sample window will take a long time to redraw. Click on the "check mark" or "X" buttons to toggle between a normal preview or a quick preview, in which case a rectangle with a criss-cross line will be shown in place of the actual object to be used. Click on the Options button and the following dialog will appear:
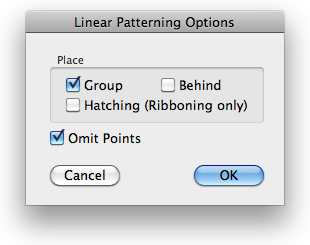
Choose Place Group if you want to place one group of all of the new objects, or as individual objects. Choose Place Behind if you want to place the new objects behind the path that you click on. Normally, the objects would be placed on the current layer and on top of the drawing, however it may be desirable to place the objects behind the object that you click on. For example, if you want to construct a serpentine wall with bricks and bushes, then you don't want the original path to be covered up. Choose Hatching if you want the objects converted to hatching. This only applies to ribboning. Lines, polygons and Béziers are converted to hatching. This means that you can create your linear patterns with the usual drawing tools but place them as hatching. Note also that you can ribbon a single object along a line to create a hatch pattern that you can use as a linear pattern. Choose Omit Points if you don't want any reference points placed. To use the tool, select the Linear Patterning tool from the WildTools palette. If the tool is set to place Rubber Stamp objects, and if the Rubber Stamp tool does not have an object in its private 'clipboard', then the Picklefork cursor will be displayed. You may use the Picklefork cursor to pick up an object in the drawing, and this will become the object that is on the Rubber Stamp tool's private 'clipboard'.
Place the cursor in the drawing area on the object that you want to place objects along. This may be a line, arc, ellipse, rectangle, polygon, B-spline, spline or Bézier. Press the mouse button. Drag away from this point in the direction you want want the objects to go. For closed shapes, you can move the mouse to position the objects where you want them along the path. In the case of a line, an open path, or for end-to-end or fixed spacing, the objects would 'hit' the end of the object. The offset distance will show in the Edit Window and Show Location bar. If the tool is set for an interactive offset, you may press the Shift key to constrain the offset to the fixed offset set in the tool's dialog box. If the tool is set for a fixed offset, you may press the Shift key to break the offset free from the constraint of the fixed offset and to set the offset interactively with the mouse. You may tab into the Edit Window to set the offset for this operation. If you do this, you may continue to move the mouse to locate the objects. You may press the Option key to toggle between the normal or a mirrored presentation. Release the mouse to complete the operation. The objects will be placed along the path. Picking-up a Rubber Stamp object To 'pick up' an object for the Rubber Stamp tool, set the Linear
Patterning tool to place Rubber Stamp objects. |
![]()
Go back to WildTools