Metalwork Without Tears:
Making the Windshield Surround and Canopy Skirt for an UnNustrini-ed Falco
![]()
Metalwork Without Tears:Making the Windshield Surround and Canopy Skirt for an UnNustrini-ed Falco |
|
by Stephan Wilkinson
|
This article appeared in the September 1989 Falco Builders Letter. |
If I'd ever had any doubts about making an airplane of wood, they disappeared during my tussle with the pool-table-size expanse of aluminum from which I cut the canopy sheetmetal for my airplane. Yes, I could have done it of fiberglass, but I find that stuff even messier and more recalcitrant than metal. Fiberglass is fine in small doses-hinge fairings, for one-but me, I would have ended up like the Tar Baby had I tried a component as big as a canopy skirt.
Still, the aluminum bit, sliced, skewered, splintered and attacked me in every way as I flailed away at it atop the picnic table (where it could best reflect the July sun back at my skinny chest). Get yourself a set of good leather work gloves for the job, the longest-bladed pair of high-quality tinsnips you can find (for the "first cut"), and the best possible set of left- and right-curving aviation shears with which to do the final trimming.
A primary principle of sheetmetal-working is that you don't cut the aluminum along the trim lines, you cut out the basic shape with the snips leaving a quarter-inch or so of excess (less if you're able to, but never try to make the first cut exactly on the trim line). Then you go to work with the aviation shears, trimming away the final curlicue of aluminum to achieve the trim line with little effort and minimal dimpling of the edge. And never make a cut that results in the jaws of the shears or snips closing completely, else you'll put a noticeable dimple in the edge you're cutting. I've been told, by the way, that there's a hand tool of some sort that will smooth out edge-dimpling in aluminum (a pair of spring-loaded rollers or balls that you run along the edge), but I haven't bothered to look for one.
The first thing you might discover as you set about building your non-Nustrini canopy skirt is that there's a considerable gap between the sides of the fuselage turtledeck and the aft/lower edge of the canopy skirt if you build the skirt according to the plans, as a relatively narrow strip of aluminum all the way around the canopy. If you assign clock positions to the fuselage cross section at about frame #7, the gap is biggest at the 10:30 and 1:30 positions. Maybe I've done something terribly wrong in building the fuselage, but Jonas Dovydenas recently mentioned that his airplane presents the identical situation.
The second thing you may find is that when you built the filler door for the rear fuel tank, you didn't take into account how far aft the canopy skirt extends. Depending on how generous you were in choosing a size for that door-I erred by about 15mm-you may have to trim one side of the canopy skirt to allow that door to be opened (with the canopy slid full forward, of course). Or modify both sides if you opt for symmetry.
All of this will become apparent as you make a pattern for the canopy skirt. You do this by going to an art-supply or stationery store and buying some large sheets of flexible posterboard or cardboard of some sort and fabricating a cardboard canopy skirt/surround. Make a pattern by using ample cardboard to allow trimming to a final size; don't try to "make" the exact outline of the skirt/surround as you go (except perhaps at the straight bottom edge of the canopy at each side of the cockpit).
Hold the cardboard in place using the same screws that are being used to hold the canopy to the canopy frame. Securely tape together all overlaps and junctures between various sheets and pieces of the cardboard, and make sure everything is absolutely flat against the canopy before you start marking it for trimming: you want to end up with a pattern that, when removed from all the curves of the canopy, lies flat-be careful not to unwittingly build any compound curves into the pattern, because the aluminum you'll be cutting is unyieldingly flat.
A confession: I have fabricated my canopy skirt/surround of four separate pieces of aluminum, for material economy as well as ease of fitting and manufacture. One piece arches up, over and around the front edge of the canopy itself. Two assumedly identical but mirror-image pieces form the lower edge and aft skirt of the canopy, one on each side. And a fourth small piece connects the two skirt-sides at the aftmost point of the canopy, also forming the small cutout through which the dorsal-fin slider tube passes. Skilled builders are welcome to make an entire one-piece canopy surround out of a single huge sheet of aluminum, wasting 95 percent of the metal but achieving an elegant component. But if there's the slightest slip betwixt pattern and metal, somewhere it ain't gonna fit. Me, I went for simplicity and correctability at the cost of some overlapping joints here and there.
The windshield surround is easy enough to make in a single piece, if you mount and trim the cardboard carefully, since it's hard-but not impossible-for compound curving and warpage to sneak into the pattern.
Once you have all the cardboard in place, mark your trim lines on it, remove it from the canopy, and cut the pattern to shape. The entire forward part of my canopy surround is of the same width-dimensions as the plans call out, but at the point where the actual "skirt" begins, aft of the cockpit side rails, the surround widens in a smooth curve to a maximum width of about 6.5 inches, then tapers back gently to stock width at the point where it reaches the area of the slider tube. It's a curve I arrived at pretty much freehand, by sketching trim lines on the cardboard and stepping back and resketching, and I finally froze it by calling in an artist friend who looked, mused, tilted his head, hummed a bit and rationalized the whole thing by muttering something about how it "echoed the curve of the top of the canopy bulge." Hey, I like it.
There's still a gap between the skirt and the fuselage skin at those 10:30 and 1:30 positions-call it a Cockpit Environmental System Ventilation Extractor Outlet, assuming there's a negative-pressure area back there-but that gap is both decreased and made less apparent by the more downward/aftward extent of the skirt. The only way to entirely eliminate the gap would be to compound-curve the aluminum of the skirt to not only extend aft but curve slightly inward as it goes. Or make it of fiberglass. I'm sure there are plenty of you out there who could do either, but I'm not one of them.
My artist friend had not only blessed my curve but given me most of a 12x4-foot roll of .020" 2024-T3 aluminum he had left over in his hangar. (Yes, artists fly too). Unfortunately, that's too thin, as light and malleable as it otherwise is. The primary purpose of the canopy surround is to act as one big, continuous "washer" for the canopy screws, and .020", even if it's free, just won't hack it.
(I think you'll find you need discrete washers under the hold-down screws anyway, incidentally. I did-both because I ended up filing holes slightly oblong here and there to refine the fit of the skirt/surround and because removing and replacing the canopy screws enough times to get the job done inevitably chews up the soft aluminum if there isn't a real washer to take the strain.)
When I realized that the .020 was much too light, I bought a 4x8' sheet of .040" 3003 aluminum-an ordinary but amply strong kind of general-construction aluminum-from a local metal-supply shop. They didn't carry 2024, a type of no use in their business, but since the canopy metal is nonstructural, the 3003 works just fine, and it saved me "aircraft-quality" prices and trucking charges from an aviation supplier. A 4x8-foot sheet-the standard configuration-is plenty for windshield and canopy both, as long as you don't want to make the canopy framework of a single continuous piece. You'll obviously want to make all your cardboard patterns first and then locate them on the 4x8 sheet in a way that affords ample unbroken area for each.
The biggest lesson I learned from experience is that no matter how carefully you mark and make the screwholes through the cardboard pattern, you should forget about transferring those holes as drilling points to the aluminum. No matter how carefully you think you've done it, you'll find the screwholes you've drilled and the holes through the Plexiglas and canopy frame increasingly diverging as you go. Use the cardboard pattern only to determine the outlines of the metal.
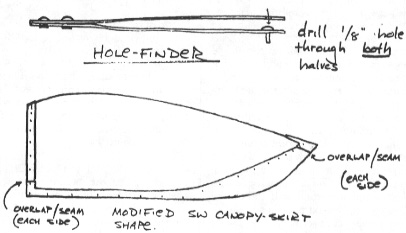
The secret is to use a "hole-finder"-a device well-known to people who build things like Thorps but a revelation to me. You can make one yourself in a few minutes from the same aluminum you're using for the canopy. It's essentially a big pair of tweezers with a rivet stuck through the end of one blade and a matching hole drilled through the end of the other blade. You slip the hole-finder over the aluminum, the blade with the rivet below the metal and the blade with the hole in it on the visible side of the sheet. Move it around so the rivet slips into the hidden screwhole you want to match, and when it does, the visible hole through the hole-finder blade marks the spot to drill. Do this hole-by-hole, in situ, as you mount the canopy surround-marking, drilling and fastening the aluminum to the canopy before you establish the next hole.
Finally, I broke a cardinal rule of Plexiglas work by stripping from the plastic all of the protective adhesive paper before I started any canopy fabrication. It's my feeling, however, that either you leave the paper 100 percent in place-which makes it difficult to trim the edges of the Plexiglas visually as you fit it to the frame and the airplane-or you take it completely off: the damage caused by trash and grit that inevitably get trapped all around the edge where you've torn the margin of the protective paper off in order to see so you can trim can be worse than what happens during careful construction procedures.
I've gotten a few scratches on the canopy and windshield here and there, but they polish away surprisingly easily with the finest wet sandpaper grades and a final buffing with one of the commercial kits such as Micro-Mesh or Poly-Sand.
Have fun, and be glad you didn't have to build the whole airplane out of such obstinate, sharp, unyielding and ugly stuff.
|
The Italians, like Stelio Wilkinson, built the canopy skirt of a soft aluminum-definitely not 2024-T3-and put joints at the same logical places. All of you who are do not have the Nustrinified canopy will find that the gap is there on the sides. The Italians formed the aluminum at the gap so that it tucked back in close to the fuselage. The air pressure at the sides is slightly negative. I just throw my maps up against the canopy rail and the suction keeps them in place. You should explain to Oshkosh nitpickers that this slight gap is an intentional part of the design; that air is extracted from the cockpit in a boundary layer that allows the fuselage to curve inward for minimum wetted area while maintaining laminar flow over the aft fuselage upperbody; that Falcos without this slight gap don't fly as fast; that you have a bridge you'd like to sell them.-Scoti |
![]()