Notes & Comments
Canopy
![]()
Notes & Comments
|
|
|
From "Construction Notes" Falco Builders Letter, June/September 2000 |
Your mind is the second thing to go. I think, can't remember what the first one was.
In our last FBL, we had details of Richard Clements' canopy seal. The only problem is, Fred Doppelt's memory of it was just a wee bit flawed. So let's revisit the idea again and see if we can't get it right this time.
You begin by installing a piece of .032" aluminum, bent to a 90° angle and installed under the canopy track so that it leaves a gap of .032" between this angle and the canopy track. This gap is the slot in which the canopy seal will run. This aluminum angle must be dimpled to fit under the dimple of the canopy track at the screw locations.
Once the canopy is installed on the canopy frame, you remove the wood strip/spacer between the canopy and the canopy frame, and you bandsaw it into two pieces with a cut right down the middle of the part. Then you sandwich a strip of nylon (.032" x 1.50") in the sawcut and screw it all back together so that the nylon strip projects downward.
Then when you put the canopy on the aircraft, fit this strip into the slot on the outside of the canopy track.
It's a very clever idea and the only negative I can see is the complexity of putting it all together, but that seems like a very minor problem indeed. Richard Clements says the idea originally came from Kent Paser who installed this on his highly modified Mustang II that achieved astonishing speeds.
|
1991 |
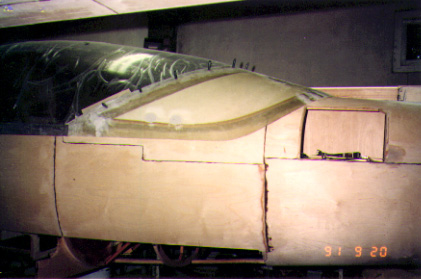
Having never seen a Nustrini canopy before (or a standard one for that matter), I have no idea if this is a good example of a 'raised Nustrini' (I wonder how Luciano feels about that expression!) or not.--Stephen Friend
|
From "Construction Notes" Falco Builders Letter, September 1991 |
Stephen Friend is installing the "high" Nustrini canopy. He reports, "Fitting the canopy skirt fairing was, in fact, the horror that I had been lead to believe it would be, but only because it is an 'unnatural' material and much trial and error was required-I don't think I would make a very good plastic aeroplane!"
"I have chosen to build the 'high' Nustrini and wanted to fit the skirt without it interfering with the battery box. Before I attached the dorsal fin, I placed the skirt in position so it just cleared the battery box opening with the canopy closed, and fitted the two forward-most screws (clecoes actually) to the canopy and canopy frame. This allowed the trailing edge to rest nicely against the fuselage but required the addition of about 25mm of extra fiberglass-it 'hinges' down-in the center and about the same amount on the forward ends to meet the side aluminum strips.
"In order to make the side and rear edges fit against the fuselage without gaps, I contact-glued a small foam filler against the underside of the skirt fairing, and laid up two layers of 10 oz. glass and West epoxy. After it had started to gel, I covered the fuselage with plastic (to keep the epoxy from sticking to it) and placed the skirt in position and stapled the floppy edge to the fuselage.
"You may wonder how this ponderous description looks. The curve of the rear of the canopy is continued to the fuselage, and a straight edge resting between the skirt and the canopy still shows 5mm of daylight at the line of screws."
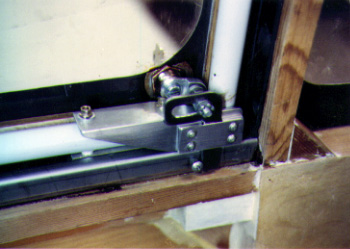
Rex Hume's canopy lock
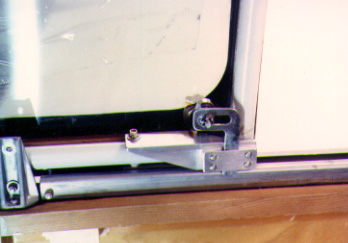
These parts are mockups, but the final design worked well.
|
From "Construction Notes" Falco Builders Letter, June 1998 |
David Carroll asks if the High Nustrini canopy affects the installation of the fuselage frame 6 diagonal. The simple answer is that there is no change here. The canopy is installed above the fuselage and you must build a projection from the fuselage to seal to the canopy frame.
|
From "Construction Notes" Falco Builders Letter, December 1994 |
Fanie Hendriks asked about installing the windshield using a method Tony Bingelis describes in Sportplane Construction Techniques. "I have already fitted the canopy and now want to have a smooth bottom retaining strip for the windshield at the front and sides with no external screws. Tony makes it very clear as to how to construct the coaming as an integral part of the fuselage, but he stops short of telling you how you finally secure the windshield at the front and at both sides."
Tony Bingelis's method is based on the assumption that you will not be using screws at all on the front and therefore there is no sensible or easy way to get screws in there, and I don't see any way of using his method and getting screws in there. Screws are important as they give strength to the windshield which in turn gives strength to the windshield bow.
Remember that the canopy latch pulls on the windshield bow, and that one Irish Falco owner and his son were killed when a seagull hit the windshield, breaking it and releasing the canopy to slide back and knock the tail off the airplane. Please, use screws.
The most common way of doing this installation with a smooth cover and screws is to first install flathead screws with Tinnerman washers. These washers are dimpled for use with flathead screws, and they spread the load into the windshield. Then make the fairing strip in place with fiberglass. Tape off an edge on the acrylic and fiberglass right up to the tape. Sand it all smooth and paint up to a taped edge.
This is the method used by most of the exceptional Falcos of Hansen, Eriksen, MacMurray and other compulsive perfectionists. The only disadvantage is that if you ever have to replace the windshield, you will destroy the fairing strip and will have to rebuild it, but the reality is that you're probably going to make a mess replacing the windshield anyway.
On installing the canopy on the frame, Fanie reports, "I used a 1mm center drill, of the kind you use in a lathe. Its shank has exactly the thickness to fit snugly in the first hole that I drilled through the acrylic. And so you get a perfectly situated pilot hole."
|
From "Construction Notes" Falco Builders Letter, September 1993 |
At Oshkosh, Cecil Rives saw a booth for Bruce's Custom Covers of Sunnyvale, California. They make fabric canopy covers. Cecil ordered one for his Falco, but since they didn't have a pattern for the Falco, the company used Larry Black's nearby Falco to make a pattern. Cecil said the canopy cover is very well done and cost $235.00. If you'd like your own, contact Bruce's Custom Covers at 800-777-6405.
|
From "Construction Notes" Falco Builders Letter, September 1993 |
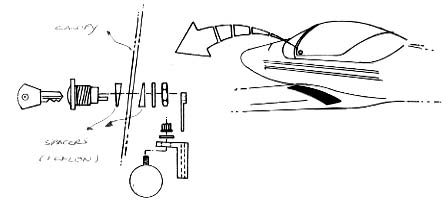
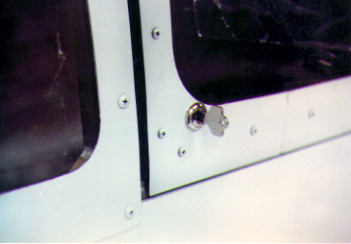
Marcelo Bellodi's canopy lock, with tapered Teflon spacers.
|
From "Construction Notes" Falco Builders Letter, September 1992 |
Cecil Rives has added some new wrinkles to the business of installing the canopy on the canopy frame. Steve Wilkinson had mentioned that he found it difficult to exactly locate the point where the canopy was touching the canopy frame, and as a result, some of the holes he drilled were a bit off. To find the tangent point, Cecil squirted water in between the tubing and the plexiglas. Capillary action draws the water to the narrowest point between the frame and the plexiglas, and it made it easy to drill the holes spot-on. If there was too much water, you could just use a paper towel to wick some out.
Cecil started at the top center and put the first four screws on each side before getting the foam P-strip into the act. You can't go much further than that, though, because the foam increases the 'circumference' that the canopy takes, and you will have major hole-alignment problems if you try to drill these holes without the foam strip in place.
After he had all the holes drilled, he took the canopy off and painted the frame. When he put the canopy back on, the danfernal thing didn't fit. Some of the holes were off by as much as 3/16". Cecil was pulling his hair (such as it is) out over this, until he finally retraced his steps. When he installed the canopy, the canopy frame was clamped to a wooden frame, and on this frame the weight of the plexiglas canopy was enough to distort the canopy frame. After he put it back on the same support, the pieces went back together perfectly.
|
From "Construction Notes" Falco Builders Letter, September 1991 |
On my way out to McCall, I finally tracked down the source of the low, soft whistle you often hear in a Falco on approach to landing. I had thought it was something to do with the wheel well being open, but it's actually the canopy seal along the sides. Mine are glued to the canopy tracks and they don't quite touch the tubing of the canopy. At cruise, the suction that builds up pulls the seal close to the canopy frame tube, and you don't get any whistling noise.
On approach to landing or when climbing out, the speed is too low to pull the seal shut. It's during this time that the whistle builds up, and it's quite easy to prove by just pushing on the seal and hearing the noise stop.
This problem is made worse on my Falco by canopy rollers which don't roll. I abuse the poor Falco and have replaced the factory rollers from time to time. I never took the time to lubricate the rollers or to make sure they were turning easily. I've noticed on some of the Falcos, these rollers are lubricated, and they're 'happy' enough with the installation to turn freely. It's quite a difference the way the canopy slides back on these planes. The preferred lubrication seems to be Tri-Flo oil.
I mention this because if the rollers don't turn, then what happens is that the canopy frame just wears the plastic away. Mine are nearly gone, and I have large flat spots where the raised 'side' of the roller is nearly worn completely away. Let this problem persist and one day you will hear a popping noise after takeoff and then you can look back at the aft canopy support and have a nice view of the ground. The canopy pulls out a couple of inches. It's unnerving, but at least in my experience it was uneventful.
|
From "Construction Notes" Falco Builders Letter, September 1991 |
The canopy cover on the Corporate Disgrace has been slowly deteriorating, to the point where it's been ripping. I had the thing repaired with fiberglass reinforced packaging tape, but this summer it was obvious that it was time to abandon the thing.
Because I have this personality deficiency of waiting until the last possible moment to deal with things like this, I found myself days before departing for Oshkosh with not one thing accomplished on this project. In a mad few days, I made a cover myself.
The first question is the material. Some people get very carried away by creating a cushioned and waterproof helmet for the airplane. As far as I'm concerned, the purpose of the canopy cover is to (a) protect the interior from the sun, (b) to keep rain from getting into the cockpit if the canopy is not tightly closed, and (c) to make people think the airplane is locked and thus not start snooping about what they might steal. The canopy cover that came with my Falco was made of a very light material, much like a bedsheet. I chose to make the new cover out of the same type of material.
The material that I got is used for curtain linings. It isn't waterproof, but it is mildly water-resistant. During Hurricane Bob, the canopy cover became completely saturated with water, but you just squeeze and shake it out.
Material like this is frightfully cheap, and all I did was to lay the cloth on the canopy, tape it in place with masking tape, cut the pieces grossly oversize and pin the pieces together with straight pins. Then it was back to the sewing machine to sew it all together. The sewing is disgraceful, but, hey, this is a functional cover and nothing else.
Because it produces a few bumps on the exterior of the airplane, few of you would do what I did, but my canopy cover is held along the windshield with six snap fasteners. That's the way the old cover was done, and it's very simple. The windshield screws are replaced with snap buttons already installed on screws. On the canopy cover, all you do is install the snap grommets, and I was astonishing how easy it is to install those. The kits you get at a hardware store include all the instructions. No big deal, you just locate the grommet, punch a hole in the fabric with a leather punch, then assemble the two pieces of the grommet on each side of the fabric, put all this in a die-and-punch set supplied with the kit and slam it with a hammer.
At the aft end, my canopy cover is held to the canopy skirt with little steel hooks. Again, there are six of them, and they are little quarter-inch wide straps of steel formed into a hook. They are much like the hooks used for hanging pictures on the wall, and there are two little holes drilled in them so that you can sew them into the canopy cover. Once you have the snap grommets in place, then you locate the hooks so it will hold things tight and start stitching away. The whole thing looks pretty flimsy, but two weeks after making it, my cover endured the 55-mph winds and rain of Hurricane Bob without a tear. In all, I think the canopy cover cost me about $35.00, and in the bargain I learned to use a sewing machine-how many of you know how to draw up a bobbin thread?
|
From "Construction Notes" Falco Builders Letter, December 1990 |
By the way, John Oliver discovered when he installed his canopy, that brad-point bits work very well with Plexiglas. Using scrap pieces, he drilled a large number of holes to see if the drills would cause a crack to start, and found the bits work just fine thank you. I've used them as well, and have never had a problem.
|
From "Construction Notes" Falco Builders Letter, December 1990 |
At the Great Oyster Fly-In, SF.260 owner Al Eynon noticed that the upper roller bolt on the aft side canopy roller mount was loose on Jim DeAngelo's Falco. He mentioned that there had been a few problems with the bolt ovalizing the hole in the aluminum casting on the SF.260s, and you had to watch the bolt to make sure it wasn't loose. With the SF.260s, the problem eventually manifests itself when the canopy frame jumps out of the rollers and a fairly large gap shows up that you can put your hand through.
I've had this happen on my Falco, but for a different reason. The upper roller was not rolling, and by opening and closing the canopy, I simply wore the thing away. We finally noticed it on the way back from Oshkosh, and the canopy had popped out. I quickly put a new roller back in when I got home. Like the SF.260, the failure seems to be minor but not something you should ignore.
|
From "Construction Notes" Falco Builders Letter, September 1989 |
Just in case any of you get this same idea, here's an idea that didn't work from Steve Wilkinson:
Any easy way to sunshade a Falco canopy, in the style of the two productions airplanes in the forground of the photo in your old full-spread promo piece (the Falcos parked in a row on a fied somewhere in Europe) is to buy the largest sheet of Opti-Cling sunshade material available from Luverne Products, 1200 Birch St., Brandon, SD 57005. Telephone (602) 582-7200 or 800-533-5328.
They advertise 22"x17" sheets, designed to stick up on the side windows of typical Cessnas and Pipers, for $11.95. Fortuitously, the largest sheet they have-54"x24"-seems to be just about exactly right for the "roof" of a Falco and only costs $30.00. The stuff clings tenaciously, and the only problem seems to be that depending on how carefully you put in in place, tiny air bubbles can get trapped under it. I suppose with a certain amount of effort they can be made to migrate to the edges and be dispelled, but at $30 I'm not going to worry a lot about it.
(Then a month later) Please disregard my earlier "advice" about buying that tinted-plastic sunshade material for use on the inside of the bubble canopy. I now have my $30 piece, and there are two problems with it: (1) It really doesn't want to take the compound-curved concave shape of the canopy interior without wrinkling, and (2) it's impossible to get all the little between-canopy-and-sheet bubbles out of a piece that large-you end with what looks like a freshman Puerto Rican pimp's attempt to tint the windows of his Camaro.
I think the piece will work fine for about a 2'x2' overhead square, atop the pilot, but that wasn't what I had in mind.
|
The production Falcos all had canopies made of three pieces and the dark piece in the middle was bonded to the clear side pieces. The SF.260 canopies are still made this way and if you'd like to adapt one to your Falco, you can order one of these $7,000 puppies through Fox 51 (who are not to blame for the cost). I've been flying under this canopy for years, and I don't care for it. It takes a second for your eyes to adjust to the change in brightness and as a result, the canopy might as well be opaque during aerobatics and quick-scans of the sky. I prefer a tennis hat with the metal button at the top removed (if you don't, turbulence can be very painful). But if you are really worried about overheating on a hot day, I'd recommend making a cloth sunshade with some thin wooden battens to hold it in place. You can stuff it away somewhere and pop it into position when you need it. John Harns does this and it works well. The shade clips over the center tube so that it will not move around, and when he wants to do a little acro or when it's cloudy, John just pushes the thing back. Alfred Scott |
|
From "Construction Notes" Falco Builders Letter, December 1988 |
The canopy installation gets mixed reviews from builders. Some find it easy and others curse at the thing. The first thing you need to know is that if you drill acrylic with an ordinary drill bit, you are probably going to ruin the thing. The reason is that a drill will bite into the acrylic and cause it to split.
There are a number of ways to drill such a hole. The most common way is to use a drill that has been sharpened so that it has "zero rake"; that is, the cutting edge has no rake to it. This prevents the drill from digging in, and the drill shaves its way through the plastic. You can buy a drill already sharpened like this from Aircraft Spruce or your local plastics supply store, or you can grind a drill yourself-as most people do.
One very safe method is to grind a hole in the plastic with a Dremel grinding bit. They have a sharp-pointed burr that works nicely.
Perhaps the cleverest method, though, is to use a brad pointed bit. I'd never heard of anyone doing this, but John Oliver came up with the idea. He practiced with a lot of scrap pieces and tried to induce a crack with the bit. It never did, and John concluded he was safe. He did the entire installation with these bits, and had no difficulty.
John used a Makita cordless drill to drill the acrylic sheet because of the lower and more controllable speeds. He used a brad pointed, 3/16" drill bit for all acrylic drilling, and he backed the acrylic sheet with 3mm plywood to avoid "break out" of the final bit of acrylic and to avoid contacting the steel tubing with the brad pointed bit.
John also used the plywood backing when doing the final drilling of the acrylic windshield against the wood to avoid an oversize hole exit when breaking through the acrylic.
His hole-drilling procedure was a two-drill operation. John marked the hole location on a piece of masking tape on the acrylic, then he drilled one-third of the way through the acrylic with the brad pointed drill. Using the center (brad point) hole to center the hole in the steel tubing or wood, John used a No. 41 drill bit (cobalt) to drill through the steel tubing. He says to start with light pressure to avoid drill wandering. He used a 1/8" drill bit for the No. 8 screws in the wood.
After the smaller holes were drilled, John finished the 3/16" holes in the acrylic with the brad pointed bit and with a piece of 3mm plywood for backing. He used a 3/8"Ø Dremel rounded-end grinding bit in the cordless drill to smooth the edge of the hole on the inside and outside. John says that if any of the holes in the acrylic need to be enlarged because of hole wandering, you should use a small drill bit (say 1/16") in a Dremel tool.
The canopy is held in place with No. 4 sheet metal screws, which screw into the tubing. Sheet metal screws are designed to go through very thin sheet metal. Typically, they push the metal around rather than cutting threads. The sheet metal screws and the 4130N steel tubing are not a happy marriage. The tubing wall is thicker than is normally encountered by a sheet metal screw, and the steel is hard and tough.
Falco builders have been looking for a tap to cut threads for a sheet metal screw for some time. It appears that no one makes such a thing, but John Oliver made his own. Self-tapping sheet metal screws are made with slots cut in them so that they cut their way into the sheet metal. John simply modified a few screws this way.
John bought some No. 4 hex head sheet metal screws and cut two self-tapping slots in the end of the screw with a Dremel cut-off tool. He then used a socket wrench to turn this homemade tap. He says that if the final screw will still not go in, to cut flats on one screw head and run it through the tapped hole with a wrench.
In fitting the canopy to the steel frame, John marked all holes, then installed first those needed to bring the acrylic flush against the tubing. John worked from the centerline outward and across the bottom last. John had the wood forming strips in place along the bottom from the start. He rough-sized the canopy before starting and finished sizing it after the holes were drilled. John said he did not find the windshield/canopy installation particularly difficult.
|
From "Construction Notes" Falco Builders Letter, December 1988 |
Steve Wilkinson said he found the canopy installation to be surprisingly easy, particularly after reading the accounts of others who found it difficult. Steve used almost the exact opposite approach from that of John Oliver. He supported the canopy frame on two sawhorses while drilling the frame. Then, when he was installing the canopy, he clamped two 1x2's to the sawhorses. These were vertical and were notched at the top. The center tube rode in the notches, and the whole thing would sway as he worked on it-thereby giving the canopy a taste of things to come when Steve flies it.
Steve drilled the holes in the steel tubing first, estimating by eye the angle at which the canopy bubble would contact the frame. He miscalculated the holes at the top front and had to drill a few new holes there, but all others worked out well.
Steve's miscalculation does not surprise me, because until you put the acrylic bubble on the frame, you will not realize how much the bubble is flexed to conform to the shape of the frame. In particular, it is pulled down a surprising amount at the top front center.
After the holes were drilled in the tubing, Steve put the canopy on the frame and started at the top front center and aft center and worked outward. One of the reasons that Steve used this method was that he was working entirely alone and could not take the bubble off the frame with every hole, as some have done.
Steve had the foam strip in place at the top front, but he would pull it out just far enough so that he could sight through the acrylic to locate the center of the hole in the acrylic. He used a leather punch to put holes in the foam strip. Steve drilled 3/32" holes in the frame, then reamed the holes with a No. 40 drill, and he said he had no difficulty getting the screws to go right in.
Although it must be obvious to everyone, the correct procedure is to first install the canopy on the canopy frame, then you fit the windshield to match the canopy. Because the windshield frame is wood, you sand on it until you get the smooth transition you are after.
The canopy has an aluminum strip which is installed around the periphery and through which the screws are installed. The aluminum strip serves the function of a washer, and it spreads the load of the screw over the plexiglas. On the French CAP-10, the canopy is installed with washers under the screws and if you like you can do that. John Oliver is doing precisely that to get the airplane in the air quickly, and he'll put in the aluminum strip at his leisure.
The drawings show the aluminum strip as 2024-T3, but I should confess that the Italians used no such thing on my Falco. The aluminum strips on my Falco are dead soft aluminum that you can bend with your fingers. At the aft end, the aluminum strips will require a certain amount of convexity to smoothly fair down from the canopy to the fuselage. This is easily done if you have the right tool-a shrinker-but almost no one has access to one of those things. Many builders have taken to substituting fiberglass for the aluminum strips, though it's not clear to me how they get the shape. I suppose they use masking tape or duct tape and cardboard, cover this with fiberglass and then rip out the tape and cardboard.
Many builders have used fiberglass around the periphery of the windshield. If they are after a smooth, flush appearance, they install flat head screws and Tinnerman washers and then cover the whole thing with fiberglass. This has the disadvantage of not allowing the windshield to be easily replaceable without repainting, but once you resign yourself to that in the unlikely event, it makes for a simple and attractive installation.
The windshield bow for the "High Nustrini" canopy installation
is installed on the forward side of fuselage frame 4.
Falco builder Pete Greenslade writes, "If you have any information on the 'raised Nustrini' canopy idea, then I should be glad to hear about it, since the appearance of the Nustrini is very appealing and if it can be made to give more headroom without too much difficulty I would like to go for it." I've done a little sketch of what is involved and included it here.
The woodwork is fairly simple. You extend frames 5 and 6 up by 38mm (that's 1.50") and then put the canopy 'gunwale' strip on top of those. The windshield bow is installed on the forward face of frame 4 and tilted to match the canopy frame. By doing this, you close up on the area of the windshield and allow the windshield that we supply to be fitted. It is not a perfect fit, but it's close enough so that you can fit things by filling in with strips of spruce.
You will also have to jack the dorsal fin up by 38mm so that the canopy roller will have something to roll upon. The biggest headache, though, will come in extending the fiberglass canopy skirt fairing. This is what Pawel Kwiecinski cursed the most. He did this by sighting down the skirt fairing to the fuselage to find the intersection, and then he used cardboard and masking tape to build the shape. To keep the fiberglass from sticking to the canopy, he put shoe cream on the acrylic bubble.
You would expect that the appearance of the airplane would be dramatically different with this change, but it really isn't. Take a look at the pictures of Pawel Kwiecinski's Falco on page 11 or in our new Falco brochure.
|
From "Construction Notes" Falco Builders Letter, December 1988 |
Dear Ms Avery: Ask Alfred if he has any ideas on how to mill the 3/8-inch radius groove in the dorsal fin. So far the only good way that I can think of would involve a router bit, but I can't find one of the proper size. If Alfred doesn't have a ready method, forget it-I'll claw that groove with my finger nails. It's a real pain in the dorsal.
Allan Hall
The only way I know to make this is with a router. First, use a Porter Cable 43651 (high speed steel) or 43147 (carbide tipped) bit to cut the groove in the edge of a board of sufficient width. Then taper the sides to the proper angle on a table saw, and finally cut the bottom at an angle to fit the fuselage. Without a cutting jig, this last step is most easily done by drawing on both sides of the wood, cutting it close to the line with a band saw and then sanding to the lines.
|
From "Construction Notes" Falco Builders Letter, March 1987 |
The canopy is installed on the canopy frame with No. 4 sheet metal screws. Unless you get the pilot hole just the right size, the screws are very difficult to get started. Sheet metal screws are intended to "cut" their own threads, but in fact they just push the metal around. The 4130 steel is thicker and tougher than most sheet metal, and it doesn't take kindly to being pushed around.
I've been wondering if you can use drywall screws to "tap" the holes. I don't know if you can get a No. 4 drywall screw, or if the threads are similar. But a case-hardened drywall screw sure wouldn't take any lip from 4130!
|
From "Construction Notes" Falco Builders Letter, June 2001 |
I'm just fitting the aluminium strips around the canopy and windshield. I have seen others make comments in the construction notes about the windshield bow bending as the canopy latch is secured. I have this happening as well to a degree, however I can't see how this wouldn't always be the case to some extent unless the latch is 'perfect' while at maximum tension and 'a bit loose' when in its over-center position, unless the seal is very soft. Mine bends a little in the max tension position, but sits nicely when over-centered.
Did your Falco have this happen at all? Or was the seal soft enough to accept pulling the canopy a little further forward so the bow did not bend at all? I'm guessing that there was some bending but obviously only a minimum is preferred to not stress the windshield.
I think the light at the end of the tunnel is actually a train!
George Richards
It's best if the tension on the latching mechanism is enough so there is some resistant to closing the latch-and this also holds it in the closing position-but not enough to bend the windshield frame or to cause a depression in the windshield.
|
From "Construction Notes" Falco Builders Letter, March/June 2002 |
I'm at the point of installing the canopy gunwales. I want to do the 'raised Nustrini' installation others have done. I see the references to the pieces that go between frames 4 and 7, and I see how they go in. My question is for the pieces that go between frames 3 and 4. Are they raised 38mm also? Or are they supposed to fit directly on the longeron as the original drawings indicate?
Pierre Wildman
Between frames 3 and 4, nothing changes. There's a drawing of this in the Skunkworks.
|
|
![]()