Notes & Comments
Cowling
![]()
Notes & Comments
|
|
|
From "Construction Notes" Falco Builders Letter, March 2004 |
When George Richards got his Falco in the air, he has a problem with the exhaust burning the cowling. Jim Petty read this and sent George a note.
"Congrats on getting your Falco in the air. That first five seconds in the air is quite a rush, isn't it.
"I was concerned about my exhaust being too close to the lower cowl (less than an inch in spots), so I added a heat shield. It consists of a layer of Fibrefrax ceramic felt (the same stuff I used behind the firewall) glued to the cowl with Fibrefrax hi-temp adhesive and covered with a layer of heavy aluminum broiling foil (Reynolds), also glued on with the same adhesive. The aluminum foil was primarily to reflect heat and also to keep the Firbefrax from getting oil-soaked. After nine years and 650 hours, it's still intact, although there're a few small holes in the foil. I haven't seen any discoloration on the outside of the cowl to indicate excessive temps, so I reckon it's working. Here's a picture showing the arrangement.
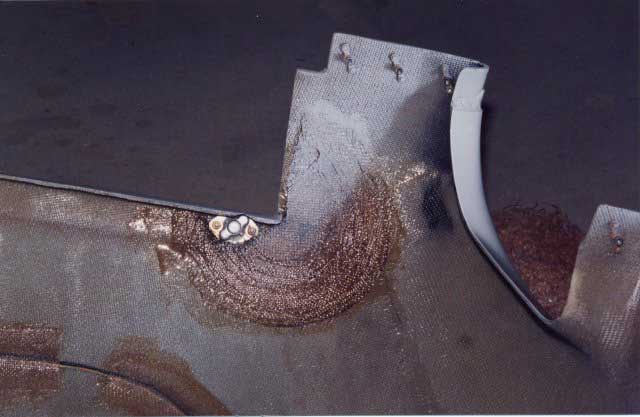
"I also have another suggestion. Early in my test flying, my bird started developing cracks radiating from the 90 degree inside corners of the upper and lower cowls. (These corners are real stress concentrators!) I stopped their progression by installing fiberglass fillets as shown in the photo below. The fillets consist of circular patches (9 layers, if I remember correctly), in decreasing sizes to taper the change in thickness and spread the stresses. If you see any cracks developing, you might want to do the same."-Jim Petty
|
From "Construction Notes" Falco Builders Letter, September 1994 |
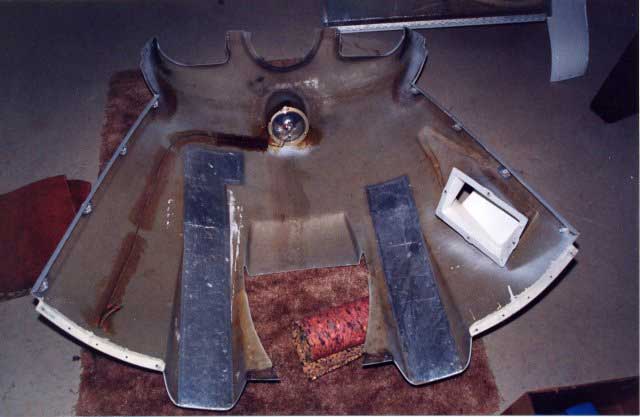
From John Devoe, "Bob Bready advises not to cut the nose gear opening in the cowling before fitting it. With the cut, the cowling is loose as a goose and could result in a poor fit. With a weight on the tail and a tail stand, the gear can, of course, be retracted. With my low ceiling and thus no tail cone, my solution was the stand shown here. The top rest of 1/4" plywood is carpeted, formed to fit four inches aft of station No. 1, slotted to accept the gear leg and rests on the sides of the nose gear well. It worked well."
|
From "Construction Notes" Falco Builders Letter, December 1996 |
Cecil was also intrigued at the possibility of closing up the cowling inlets for greater speed. His 180 hp engine has always cooled well, and he's seen so many Lancairs and Glasairs with miniscule air inlets that he wanted to see if he could safely reduce the opening size and get some more speed.
There's never been any doubt in my mind that this could be done. The Falco's engine air inlets are generous and have cooled all of the engines well. There has been a lot of good work done in reducing the cooling drag of aircraft engines, notably with the Swearingen SX-300 and some of the LoPresti planes. In all of these cases, the inlet was reduced to a small round opening, well outboard from the propeller, and then a tapered cone of about 7° was used on the inside to decelerate the air. Remember from Bernoulli's counter-intuitive theory that decelerating the air causes the pressure to increase.
To do this on a Falco would require an extensive and expensive re-design process, and then the cowling mold would have to be changed. With an original cost in our cowling mold of $30,000, I don't feel like doing that, and also there would be many people who would rebel at the 'non-Frati' appearance of such a cowling. But I'm happy to see individual builders like Cecil tinker with the opening and in this case Cecil reports that there is a substantial increase in speed.
|
From "Construction Notes" Falco Builders Letter, September 1991 |
John Harns has also modified the front of the cowling in two ways. As previously reported, like Karl Hansen, he has closed up the gap behind the spinner. He did this by gluing rigid foam to the front of the cowling, shaping it and then filling in the 'pores' with an epoxy/microballoon mixture.
This whole thing was something of an experiment because the engine moves around a considerable amount during aerobatics, and over the years with other airplanes there have been some rather distressing 'events' when the spinner hit the cowling-essentially the spinner destroys the cowling, all of which makes the flight a bit unpleasant. But by keeping the 'filler' as a frangible foam-and-microballoon piece, any contact would quickly wear the filler block away. At least that's the theory.
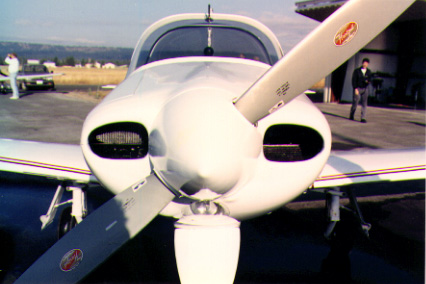
Here are the cowling air inlets that John Harns closed up by 1.5"
and which give him five additional knots.
John has closed the gap down to 1/8" and so far has not seen any contact during aerobatics-and John does a lot of akro. During one cross-country flight, he picked up some ice, and apparently as the ice melted and slid aft off the spinner, it cut a groove into the foam. That's the only mark made yet on the filler block, which is painted like the rest of the cowling, so it looks quite normal. John says this closing of the gap behind the spinner is worth about 5 knots.
John is the first Falco builder with our cowling to close up the air inlets for the engine. (Tony Bingelis once made some plugs to close things up, got a speed increase but also a worrisome climb in oil temperature.) John closed up the bottom of the inlet by 1/2" essentially by extending our 'ramp' straight forward, and closed up the top of the inlet by 1". He said it gained him about 5 knots. The temperatures are increased slightly, and he thinks he could close it up even more and still have good cooling. John has the 160 hp engine.
|
From "Construction Notes" Falco Builders Letter, June 1988 |
I stopped by to see Joel Shankle the other day and noticed a couple of very minor things that he had not seen. Our cowling is supplied with a little extra material at the propeller opening. Take a look at the cowling installation drawing, and you will see that the cowling has a flat area behind the spinner and a 45° flange at the center-but that's all. As supplied, there is some extra material on the inside, and you have to trim that off. Also, at the bottom, you will need to trim about 3mm off the 45° flange to allow for movement of the engine. In a loop, the engine can tilt down as much as .85", so you need that much clearance on the bottom.
|
From "Construction Notes" Falco Builders Letter, September 1988 |
We are now shipping the induction air scoop with Kit No. 817-2. I don't yet have a proper installation drawing, but we do have a preliminary drawing that shows this. This is a real time-saver and is an easy installation, but the order of assembly is important. First, you must assemble the scoop, filter and funnel. Drill for the bolts, install the nutplates in the scoop and trim off the excess fiberglass.
Then position the whole assembly in the cowling. The engine and cowling must both be installed on the airplane. You should also have the electric boost pump installed on the firewall. You will find that the induction scoop/filter/funnel assembly will only go one place. The upper flange of the scoop will fit against-and parallel to-the joggle for the cowling door. The funnel will just touch the engine mount tube on the bottom. The three-inch Aeroduct tubing should take a smooth bend into the injector.
The only problem is with the throttle cable. It crosses the top of the Aeroduct tubing and presses against it. Some builders have raised the throttle cable by a half-inch by making a two-hole Siamese washer to move the cable up. One hole of the washer is bolted where the throttle would have been, and the throttle is installed in the other hole.
Once you have the assembly located properly, drill a couple of holes through the flange of the inlet and the cowling to hold the assembly in place with screws or Clecos. Cut the opening for the inlet to match the scoop and then epoxy the scoop in place. I think it is a good idea to put at least one layer of fiberglass over the flange all the way around. The Aeroduct tubing is a short section of fairly stiff tubing, and it will be yanked around a bit by the engine on startup and shutdown, so the installation should be quite rugged.
|
July 2002 |
I know that the plans describe how to set Dzus fasteners but for an idiot like me it's nice to have pictures. On that note, I thought you might like the link to the company's site that shows you how to do it.
http://www.dzus.com/install/slstud.html
George Richards
|
From "Construction Notes" Falco Builders Letter, December 2001 |
Kim Mitchell asks, "When I installed the engine cowling, I did not get a good fit of the cowling doors. Air flow through the cowling exerts a strong force lifting the aft end of the cowling doors. This exerts a force on the top cowling where the hinge attaches to it."
"The top cowling is starting to show stress fatigue. I have reinforced the cowling with more layers of fiberglass, but this seems to be only a temporary fix. Now I have made aluminum straps, held down by the screws which attach the cowling to the firewall, and extending over the back edge of the cowling doors. This seems to solve the problem, but now the straps have to be removed to open the cowling doors. Any ideas?"
I don't have any good answers for this. From what I know, others have had a minor problem with the doors pushing up and some have installed screws on the aft end of the cowling door. It works fine in terms of holding the door closed, but the screw has to be removed before you can open the door. If I owned a Falco like that, I would have constant nightmares that someone would try to pop open the cowling for a quick look at the engine.
I would be inclined toward the solution of reinforcing and stiffening the existing design so that the doors would hold their shape and stay closed without benefit of extra screws or fasteners.
Part of this problem may be coming from the fact that plenty of you out there with Falcos are getting a lot of speed out of your birds. Cecil Rives has his Falco really cooking and he's talking about trying the idea of a plenum over the engine, similar in design to what Swearingen did with the SX.300. I have no idea if it's a good idea or not. It does contain the air, but it creates clearance problems with the cowling, and it's a problem getting to the engine to work on it. Like all pioneering, I would not want to be the first on my block to try it.
|
|
![]()