Low Ceilings and the Falco
![]()
Low Ceilings and the Falco |
|
by John Brooks Devoe
This appeared in the March 1991 issue of the Falco Builders Letter. |
Not infrequently, as I flip through the pages of the Falco Builder Letter, I look with envy at those builders who appear to have facilities of grand proportions with respect to both square footage and height. Then we have Jim DeAngelo who made a T-hangar out of a mere garage, Bob Bready who threatens to knock down a wall in a furniture store (his own), and Steve Wilkinson with his ancient barn with limited egress, albeit he can nail stuff to the floor.
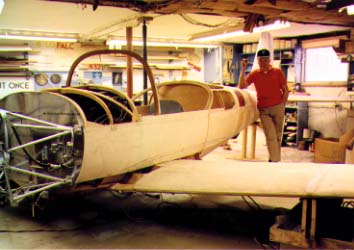
I have a broken-to-overcast sky at 83-5/8" in an area measuring 23'x34'. The area I have is adequate, and I do have an 8'4" garage door in my basement hangar. But height presents problems. Short of putting the vertical stabilizer on a fold-down hinge, I must find other ways to work around the limitations extant, since Alfred would never okay the hinge. Changes you know.
When the wing was put into cruise position from the upright jig mode, I built the supports under wing stations 6 low enough to accommodate the tail when attached to the fuselage. Before the six man/woman crew lowered the wing to the floor, I removed the main gear, since it could not be extended on the low stands.
The fuselage is now virtually complete except for some bottom skinning. The next step is to commit myself to the belief that you can cut a Falco in half-many of my friends have done so. Once so cut, I can set the tail cone aside and get the truncated wing/fuselage up on the gear.
The wing skinning procedure I used worked extremely well (described in Sept 88 FBL, page 8) and I did it in a heated shop during a New England winter. The shop is heated with electric radiant heating panels, thus there is no hot air blowing around. I took the further precaution of running two humidifiers constantly, both in advance (to acclimatize the plywood) and during the skinning. There does not appear to be a ripple anywhere, but the painting process will be the real test.
I continue to use the sequences described in the manual, going for the internal fuselage jig for space reasons as well as its relatively simple construction. I do not have Steve W's wooden floor, so I simply glued the post to my concrete floor with the ubiquitous West System epoxy.
I found the assembly of the frames and longerons quite without a problem, and once finished I glued the fuselage skins on dry. A good pneumatic staple gun, and a from-the-center-out stapling sequence did it.
The manual does not mention float-sanding of the fuselage-Alfred figures we're in the big leagues by this time-but I did it anyway using a system described by Bob Bready. Prepare a 4" by 4' piece of 1/4" plywood or Masonite by gluing an abrasive material of your choice on one side and then mount one 1"x4" dowel on the other side. With your spouse or other interested (?) party on the other end, you will find float-sanding the fuselage a lot easier than doing the same to the wing.
A cautionary note on skinning the tail cone. When you mount the finished empennage on the fuselage, you will note an easy tendency for the horizontal stabilizer to tilt. Unless you want a modified V-tailed Bonanza, the tail should be stabilized in a level position. Level the aircraft wing with a water level. Do the same to the tail. Next, run two stranded steel cables (of heavy picture-wire size) from the elevator hinges to the ceiling-a low ceiling is a benefit this time-with a turnbuckle on each side, and use these to 'fix' the level as you glue/staple on the skin.
Canopy is next. They say it's a cinch!
![]()