Two-Axis Autopilot
for the Falco
![]()
Two-Axis Autopilot
|
|
by Cecil Rives
|
This article appeared in the March 2000 Falco Builders Letter |
After making several long cross-country trips in 63KC it became clear that a two-axis autopilot would be a welcome addition to the aircraft. I had installed an overhauled Century I upon completion of the Falco and had enjoyed its use on all these trips. The thought of having the additional pitch control however, was too much to resist. (Honestly, I'm just a gadget freak.)
An article in The Aviation Consumer (Oct.'97) convinced me that the S-Tec System 30 would be the unit of choice. The author of that article stated that "there isn't anything on the market quite like the System 30". The S-Tec 20/30 is a rate-based system which means that it responds only to the rate of change of the aircraft's actual position in space at any given moment. The System 20 is Heading Hold only and the addition of the System 30 provides the Altitude Hold. The Heading Hold gyro, computer, mode annunciator and mode selector are all contained in the same instrument case as the turn coordinator and are electrically driven (similar to the Century I). The instrument is installed in the instrument panel in a standard 3-1/8 hole. Adding the System 30 Altitude Hold requires the installation of the pitch computer, pitch servo, and pressure transducer.
In operation, the system requires about a one- to two-minute warm-up before the "Ready" light illuminates. Then, you make your choice of heading modes: Roll Stabilization, Heading (requires a D.G. with a heading bug and electronic sensors to provide heading information to the autopilot), Nav/GPS Tracking-Lo Sensitivity and Nav/GPS Tracking-Hi Sensitivity. The Altitude Hold may be engaged or disengaged by a switch mounted in the instrument panel or in the control stick grip. The Altitude Hold provides no modifier, no vertical speed and no glideslope. Nor does it have automatic pitch trim. Annunciator lights on the instrument face warn the pilot when the pilot needs to either trim up or down with the aircraft trim control.
In order to install the S-Tec in the Falco two modifications to the aircraft (Ouch! Stop that, Alfred!) must be made. First, the instrument panel must be permanently moved 1/2" aft in order to accommodate the turn coordinator/roll computer. This is not as difficult as it may sound. You must replace the mounting bolts for the instrument panel in fuselage frame #3 with ones that are 1/2" longer. Then, by using 1/2" spacers the panel can be mounted in the required position. Also, the pedestal below the panel must be moved aft by the same amount and the center console trimmed to fit. (By the way, this relocation of the panel relieves some of the strain on the three connector plugs at the back of the panel and provides a little more room to remove individual instruments when necessary.)
The second mod requires the carving out of the lower spruce mounting block for the roll servo as the capstan of the S-Tec is slightly larger than the Century I. After the servo is mounted its cables are attached to the aft aileron cable.
With the instrument panel out of the airplane, I took it to the avionics shop where I had purchased the autopilot and had them do the wiring. (I had also added an S-Tec D.G. with heading bug.)
The wiring in the aircraft I did myself and in the process added stick grips that accommodate the mike switches plus the autopilot disconnect, mode, and altitude hold switches.
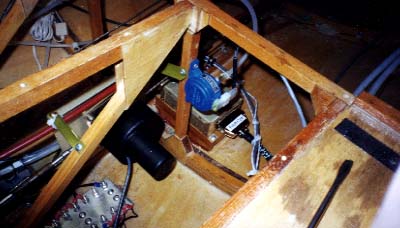
The mounting of the pitch computer is a little more complicated in that a small platform must be fabricated and attached to the lower center longeron and adjacent skin area of the fuselage just aft of fuselage frame #7. This platform must be shaped so that the computer is no more than 10 degrees off the horizontal when the airplane is in level flight. It should also be parallel to the lateral axis of the airplane.
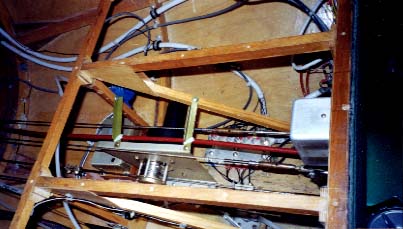
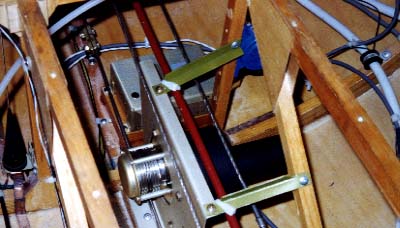
The pitch servo is mounted in an aluminum bracket (available from S-Tec) and then mounted in the airplane so that it's capstan is in proximity to the lower elevator control cable (see photos).
The pressure transducer can be mounted on one of the vertical members of fuselage frame #7 and its tubing connected to the Falco's static lines on the right side of the aircraft.
After connecting all the receptacles and plugs and performing all the pre-flight tests as outlined in the installation manual, the S-Tec worked on the first try-except the roll and pitch commands were reversed! This was corrected by swapping two wires in the servo plug connectors.
In flight, the S-Tec works beautifully! It certainly gives you more time to look for other aircraft, admire the scenery or look at maps.
If you have any questions or comments I may be contacted at Falco@flash.net or 713/461-4203.
|
|
![]()