Replacing--and Improving--Your Falco's Vacuum Pump
![]()
Replacing--and Improving--Your Falco's Vacuum Pump |
|
by Stephan Wilkinson
|
This article appeared in the June 1996 Falco Builders Letter |
Death, taxes and vacuum-pump failures: three certainties. You'll be replacing your Falco's Airborne dry pump any day now. As we all know, these puppies wear out in anything from 10 to an absolute maximum of 900 or 1,000 hours, with the median being about 400 hours if you take reasonable care of the pump. (Which means bagging it when you wash down the engine, replacing the Garlock oil seal whenever it begins to leak, changing both the regulator and system filter when you do your annual, not using Teflon tape or sealants on any of the pipe joints in the system, and the like.)
Mine failed at 330 hours, though because I have an alternate-vacuum-source shuttle valve, it didn't cause any difficulties. I was returning from an appointment in Washington, VFR at 9,500, when I noticed that the peanut vacuum gauge was indicating suction of only about 2.5 pounds. When I checked it by throttling back (thus temporarily creating considerable manifold vacuum), the gauge went back into the green-about 5.5 psi. Obviously, the shuttle valve in the engine compartment had defaulted to the stronger of my Falco's two vacuum sources, which at that moment happened to be the intake manifold rather than the pump.
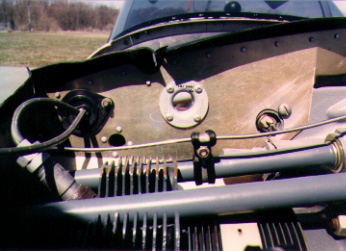
The plastic flange is installed on the right baffle.
If you want one of the shuttle valves, Alfred Scott is your man. Sequoia can get them special order for you, and they're identical to the valves that are at the heart of the Precise Flight alternate-source system, with one difference: they aren't wired to turn on a "pump inop" light on the panel. You'll have to monitor the gauges, you poor thing.
Interestingly, the gyro instruments continued to run apparently normally even at 2.5 psi of vacuum; I'd wondered if they would quickly spool down, thus requiring a constant cruise/throttle-back/cruise routine in IFR conditions, to force the instruments to spin back up temporarily. It didn't seem to be the case.
Nevertheless, I canceled plans to take the Falco to Detroit several days later, where I was scheduled to undertake for a car magazine the onerous task of road-testing a Hummer-the civilian version of the Humvee military vehicle featured in Desert Storm. But that's another story. Anyway, I went via Uselessair, expecting bad weather on the day I was scheduled to return, and of course the weather was clear for days. (But what the hell, I got to go shopping for software in the mall at PIT....)
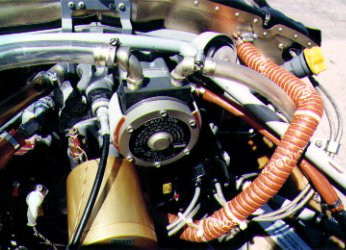
When I came home to replace 747SW's failing pump, I did two things: substituted a Sigma Tek 1U128-006 "Gold Label" pump for the Airborne 211CC that I was removing, and installed a Rapco pump cooling kit. You might want to consider doing the same. If nothing else, the Sigma Tek pump has a two-year/1,000-hour warranty (whichever comes first) versus the Airborne pump's one-year/700-hour guarantee. That doesn't mean it is a better pump, but it's a strong suggestion. And right now it costs less: I paid Chief Aircraft $350 for mine outright (new, of course); they didn't want a core exchange. Airborne pumps advertised by a variety of sources in Trade-a-Plane seem to be going for $430 to $450 including the core exchange. (In fact, I'll be selling my junk Airborne core and will thus lower the cost even further.)
The basic difference in the Sigma Tek pump is that the rotor is aluminum, while the Airborne's is made of the same graphite as are the blades. Also, the Sigma Tek pump can be spun in either direction, while the Airbornes are "handed"; they come as either CC (counterclockwise) models, as on the Falco's Lycomings, or the less common CWs (clockwise).
Rapco makes cooling kits for both Airborne and Sigma Tek pumps, and they consist simply of a plastic shroud that fits around the midsection of the pump, a length of 1" CAT tubing, and a flange that fits onto a hole that you cut in the righthand aft engine-cooling baffle. A blast of air is thus piped to the pump, supposedly lengthening its life expectancy.
Rapco claims that the prime cause of premature dry air pump failure is overheating, though I suspect the prime cause is contamination of the incoming air by dirt, oil, phlogiston, bad karma and the like. But cooling air can't hurt, and the FAA/PMA-approved kit only costs $44. Okay, it consists of nothing more than two pieces of plastic; a foot and a half of cheesy ducting that I wouldn't put on a Subaru, much less a Falco; and two plastic Ty-Raps that Rapco provides in place of the proper Breeze clamps. But that's the price of the validation, inspection, quality control and paperwork demanded by the FAA for STCing and "parts manufacturing authorization," and ultimately, it's a good thing.

Installation is simple. Cut a 1 1/8" hole in the baffle, machine-screw or rivet the plastic flange in place, snap the shroud onto the pump, run the hose between the two, and you're done. The only additional details are that the kit instructions require Dow RTV 736 high-temperature sealant or the equivalent between flange and baffle (which I did) and at each end of the hose (which I didn't, since I don't want my hose glued in place). I suspect the requirement to glue the hose in place-which indeed would be a requirement were an A&P to do an STCed installation-is simply the result of an overzealous FAA person covering every base before signing off on the STC, since I've never heard of CAT/SCAT/SCEET ducting being sealed to its flange in that manner no matter how critical it is.
They also need you to place enough RTV at the mating of the shroud and the pump to seal the plastic shroud in position. You're then supposed to go back into the engine compartment and seal up with RTV enough baffling leaks and inter-cylinder spaces to equal the area of the hole you've cut in the rear baffle. This is done on the assumption that you're depriving the engine of that much cooling-air flow, which is now going to the vacuum pump. That's fine for an STCed installation on a Cherokee, but most of us have already sealed up all those ugly leaks. If you haven't, here's a good excuse to do it.
Installing the kit on an IO-360 (and I assume an IO-320), you'll also have to file a notch in the thick plastic of the cooling shroud so that it fits between the pump body and the tachometer drive-a slight modification that is specified in the instructions, though they warn you not to file through the shroud. I used a Dremel tool and cutting burr to quickly make a relatively neat, 3/4"-long notch and checked the thickness of my cut by holding the shroud up to the sunlight until I could see the translucency where the plastic was getting thin.
Unfortunately, the Rapco kit supplies only 18" of cheap CAT tubing, and you'll need at least six inches more than that to reach from the engine-baffle flange down and around the right magneto and back up to the cooling shroud. But you're going to buy nice orange silicone SCAT or even double-wall SCEET anyway, right? And lose the Ty-Raps; real men use hose clamps.
If you're going to change your vacuum pump-whether to a Sigma Tek or the standard Airborne-what you actually need to order are not only the pump itself but a new vacuum-system filter and a new Garlock seal for where the pump shaft fits into the accessory case. (The warranties generally assume replacement of the filter and seal.) The filter element is $14.50, the Garlock is $5.15, and while you're at it, why not spring for a new air-regulator filter for $1.95?
The hardest part of replacing the Garlock is getting the old one out, which requires prying and levering with a hook-ended tool; an A&P who helped me eventually gave up and punched a small hole in the Garlock and inserted a sheetmetal screw, giving him something to get a grip on with pliers. The new seal is simply driven into place manually. You could get fancy and use a bench press or even heat the aluminum pad and freeze the Garlock, but my friend-who does this every day-simply used a mallet, a seal-driving tool (a large deep socket looked like it would work as well) and a careful eye as he tap-tap-tapped it into place.
Replacement of a vacuum pump is not rocket science, though some A&Ps-and the FARs, as far as production airplanes are concerned-will tell you that it's beyond the capability of ordinary pilots. They may be accustomed to the habits of one local EAAer friend of mine who, when I gave him a ride to his hangar so he could work on his junky little single-seat "aerobatic" (God help us) biplane, proceeded to remove the lovely three-blade Hoffmann composite propeller with a pipe wrench because he'd forgotten to bring along the proper-size socket.
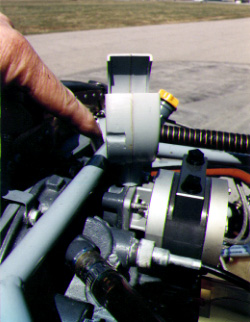
Women, and Steve Wilkinson, accessorize.
Nevertheless, putting on a new vacuum pump requires an acceptable level of cleanliness, proper torquing, and one other thing: the ability to re-time the right magneto of your engine. There's virtually no way you'll loosen the lower right mounting nut without removing the mag, at which point the nut is totally accessible with an ordinary open-end wrench. Some A&Ps fabricate a special tool or loosen the nut by jimmying it with a long screwdriver and a mallet, but most admit that the damn nut is virtually inaccessible on the IO-360.
Warning! If you do pull the mag, immediately stuff a clean rag tightly into the substantial opening in the accessory case and leave it there. Many an unhappy mechanic has watched a nut or washer from the vacuum pump plummet into this maw just as surely as toast falls jam-side down, and then you're looking at pulling the entire accessory case to get it back out.
Timing a magneto is simple, if you have the proper timing light/buzzer unit ($59.95 in my Aircraft Spruce catalogue) and the instructions that come with it. Because our magnetos are so archaic, the procedure used is identical to the one your grandfather used on his Model T Ford. Literally. Even though he didn't have the FAA to help him.
The only other major point to consider when replacing a vacuum pump is to do some basic troubleshooting regarding the cause of the failure, especially if the pump's demise was particularly premature, rather than simply slapping a new pump in place and launching on your next trip. Is there residual contamination in the supply line? You need to clean it out. Is your filter so overloaded it's letting in twigs and pebbles? You need to replace it. Did oil contaminate the pump? You need to find and fix the source.
Finally, if you're replacing a counterclockwise-rotating Airborne pump with a Sigma Tek that rotates either way, you should know which way counterclockwise is, since the Sigma Tek simply has arrows denoting rotation direction to indicate which of the two pipe-joint fittings atop the pump becomes the inlet and which the exhaust. The easy answer is that they're in the same positions as the ones you removed from the Airborne pump, but just so you know, all engine- and accessory-rotation directions are given as viewed from the cockpit, looking forward, not as seen from the prop looking aft.
|
|
![]()