Notes & Comments
Painting
![]()
Notes & Comments
|
|
|
From "Construction Notes" Falco Builders Letter, March 2000 |
Somewhere, long ago, we described the finishing process of the Falco, but let's cover this subject again. When the airplane is complete with all of the plywood skins installed, the next step is to cover it with a thin layer of fiberglass cloth and epoxy resin. This is to protect the wood from moisture and to provide a toughened surface to survive hangar rash and the fondling of the truly twisted perverts of aviation.
The best procedure is to use West System epoxy resin and a very light fiberglass cloth, typically a 2 oz fiberglass cloth. There is no special brand of cloth required, and the type of cloth used here is typically sold as a deck cloth for boats. It's intended as a moisture protection layer only and to be used on top of wood. Some people use some of the extremely lightweight cloths sold in model airplane shops, but I doubt the effort is worth it.
Lay the fiberglass cloth on the dry plywood skin, then brush on an ample supply of mixed epoxy resin and use a brush to work the epoxy into the cloth and so that all bubbles under the cloth are eliminated and so that all white areas in the cloth are eliminated. You want a completely saturated cloth and to get this, you must use an excessive amount of resin. When the fiberglass cloth is completely wetted out and the epoxy has penetrated completely to the plywood, then use a plastic squeegee to squeeze the excess resin out and work this resin into a new area of the skin.
If you're working on the wing, you would typically start by brushing an area, say 6 to 12 inches wide, along the leading edge, and then squeegee the excess resin into the dry area aft of this strip, brush on more resin and then squeegee it again back until the entire wing is covered.
Some people use a heat gun in one hand to heat the resin so it flows easily. With a little heat, the viscosity of epoxy changes dramatically, and it becomes very thin and watery with a little extra heat. Others have blotted the entire surface when finished with a layer of paper towels to absorb any excessive resin.
The weave of the thin fiberglass cloth typically becomes completely invisible when it is wetted out with epoxy. The birch plywood looks as if it had been varnished.
Let's also remember why we use a fiberglass cloth at all. For one thing, when you use a thin fiberglass cloth and squeegee out all excessive resin, you get an exceptionally consistent film thickness, and it is much thinner and weighs much less than if you had simply brushed on a coat of epoxy. Second, the fiberglass cloth displaces the resin and the combination is very light and it adds some stiffness to the plywood panel.
Third, the combination of the resin and cloth produces a tough membrane over the wood. Cured epoxy by itself is brittle, and it's susceptible to cracking and crazing, while a combination of cloth and resin is not. You want a layer of fiberglass under the paint so that if the paint cracks over time, the crack will stop at the fiberglass layer. Without the fiberglass cloth, who is to know if a crack in the paint would continue on into the wood?
When the epoxy is set up, the next step is to fill the low spots with microballoons and epoxy. Microballoons come in two types, glass and phenolic. Glass microballoons are white and the phenolic ones are brownish purple. Either material is fine, and there really is no appreciable difference in the choice of microballoons. You can buy microballoons from Aircraft Spruce, Wicks Aircraft, Gougeon Brothers (manufacturers of West System epoxy) and many other suppliers.
To apply the microballoons, mix the two parts of epoxy together in a cup and then add microballoons. In the world of fiberglass airplanes, they talk of 'wet micro' and 'dry micro'. Dry micro is a mixture with so much microballoons that it resembles a cake icing. Wet micro is somewhat runny. In our case, typically you want a 'dry micro' mix that you will squeegee into the low spots. Do not try to be too accurate here, but just try to fill in the low spots, let the epoxy harden overnight and then start sanding.
This is a good time to remind ourselves why we use West System in the first place. First off, West System is formulated as a moisture protection layer, and thus it has a different composition from an epoxy intended for some other purpose. Second, West System sands easily when it hardens, and this is a critical difference. Many epoxies become gummy when hard, and they are impossible to sand, while a hardened dry micro mixture will sand almost as easily as a block of rigid foam. If you try using a brand of epoxy that becomes gummy when hard, you will have a nightmare on your hands.
There has always been a healthy debate about whether to use microballoons under the fiberglass layer or on top of it. The argument for using microballoons first is simply that you want to fill the depressions before you put on the fiberglass cloth. While there's no right or wrong way, typically we recommend putting the microballoons on after the cloth because of the difficulty of sanding the micro without also sanding into the plywood -- but if you're pigheaded then you're going to do it the way you want anyway.
When you sand the microballoons smooth, be sure to use a bright light held at a shallow angle to the surface to cast shadows into the low spots. It's very easy to convince yourself that you have a super smooth surface in a normally lighted garage, and then suffer the indignities of painting it and wheeling the plane out into the sunlight.
When the microballoon surface is smooth, typically you use a sanding primer/surfacer and then the final paint. A primer/surfacer is a thick paint-like substance that's heavily filled with industrial talc or some similar material. You can brush or spray it on, and then sand off the high spots. This is where the incredibly smooth surfaces of composite aircraft come from, but be warned, this material is also very heavy.
In the early days of fiberglass aircraft, the primer/surfacer of choice of Featherfill, and while it's an excellent material, it has a polyester resin base, and polyester is hygroscopic. It's like salt; it attracts and retains moisture from the air-it becomes heavy, defeats the whole moisture-protection scheme, and often causes the finish coat of paint to flake off. You're much better off getting an epoxy-based primer/surfacer. There are many on the market these day, and they are used on all of the composite kitplanes out there.
And when it comes to sanding, there are two tools which I would like to recommend. Forget all about power tools here, you simply don't have the fine control. I like to use both a board sander and a sanding spline, often alternating between the two.
A board sander is a standard device sold in automotive paint stores, and it's for use with sandpaper sheets that measure 2.74"x17.5" (70x444mm). These are used in auto body shops, and you can buy the sandpaper in a wide variety of grades, from the very rough 36 grit, medium 80 or 100 grit, or 180 grit for a final sanding. Start out with rough paper and work your way up to the finer grits as you get closer to the final finish.
You can, of course, also make your own sanding boards by gluing these strips to long, smooth boards or aluminum tees or angles. I prefer the board sanders for the heavy work because you go through so many strips of sandpaper and it's easy to replace the strips.
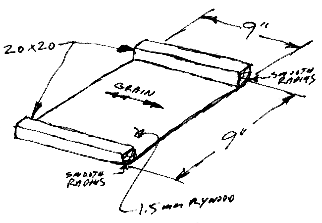
A sanding spline
But I think the most valuable tool is a 'sanding spline'. These were first promoted by Burt Rutan on his earliest designs and it's a deceptively simple device. In the U.S., a standard sheet of sandpaper measures 9 x 11 inches, so a sanding spline measures about 9 inches square and with a couple of 3/4" square strips of wood glued to each end. Make it from 1.5mm mahogany or birch plywood with the grain direction of the plywood parallel to the two square strips of wood. Round off the edges and then use it with a sheet of sandpaper to sand the wing.
The idea is that the sandpaper will wrap up around the two strips, which you use as handles for each hand, and with your fingers you hold both the sandpaper and the strips. The plywood will flex with the curvature of the wing or fuselage, and you sand at 45° to the leading edge, always moving around and never sanding in the same place twice.
You won't understand the genius of this device until you work with it, and it will quickly become clear where the high and low spots are on the airplane.
|
From "Construction Notes" Falco Builders Letter, March 1994 |
Jim Petty reports that he has had good luck with an epoxy sanding primer, something called W.L.S. 200-69 grey, which is made by W.L.S. Coatings, Los Angeles, California. Jim got his from the Lancair folks, who apparently use it on their airplane.
|
From "Construction Notes" Falco Builders Letter, June 1993 |
Mario Domingues in Portugal asks about the kind of fiberglass that you use on the outside of the airplane for moisture protection, and at the hinges whether the fiberglass should go over or under the hinges.
The fiberglass cloth that we normally use has a weight of 1.5 to 2 ounces per square yard. This type of cloth is commonly used as a protective coating for wooden boats, and it is slightly heavier than the nylon cloth used for ladies' stockings. The only purpose is that there be a layer of cloth ot assure a minimum thickness of the coating and to prevent cracking. If you were to brush epoxy resin alone on the airplane, it could crack, while if a fabric is in there, it will not crack. Secondly, when you drag a piece of plastic (commonly called a "squeegee") across it, the fabric insures a consistent film thickness.
We normally suggest coating the outside of the airplane this way, however in areas such as inside the wheel well and along the aft face of the aft wing spar, etc. (in other words, those areas which are not subject to abrasion from dust in the air, rain, etc.), the use of a fiberglass cloth is not really necessary at all. Most people just paint on a thin layer of epoxy without any fiberglass cloth. However, you may use the fiberglass cloth if you wish, but it should always be under the hinges. You would always want to be able to remove the hinges.
|
From "Construction Notes" Falco Builders Letter, June 1988 |
On another subject, metallic paint. I have written dozens of letters to experts and "experts" in the fields of radios, antennae, and paint with no satisfactory answer to the question of how metallic paint will affect radio transmission/reception in a wood aircraft with internal antennae. I have the answer, quite by accident. I was looking for a paint less toxic than Imron and some of the polyurethane products. Blue River Aircraft Supply has a polyurethane water dispersable, non-toxic paint. (Sorry to interrupt, John, but I would not believe a word of this "non-toxic" claim. It's a polyurethane paint, so please wear a proper mask.-Alfred Scott) It is extremely flexible, high gloss and can be used on fabric, wood, or fabric over wood. The metallics are outstanding, and the "metal" is mica, a non-metallic mineral. Dupont advised me that they use metal, i.e. aluminum. I have used Blue River's Flexi-Gloss on my landing gear and am impressed. Sample kits and a free video are available. Blue River Aircraft Supply, Box 91, Harvard, Nebraska 68944. Telephone (402) 772-3651. They will send free samples.
John Devoe
|
From "Construction Notes" Falco Builders Letter, June 1988 |
Charles Gutzman recently painted his Falco. Even with the best workmanship, you will find that you have to use microballoons to get a really smooth surface. Microballoons are tiny glass or phenolic bubbles that you mix with epoxy and use as filler. 'Dry micro' is a mixture that has so little epoxy that it will stand on its own, like cake icing. This makes it very light, and it is easy to sand since it becomes a rigid foam when the epoxy hardens. (You must be careful to use the right resin, or you will have a horrible gummy mess. West System or Safe-T-Poxy will work.)
Because dry micro is so dry, it will not adhere to the wood very well, so Charles Gutzman first applied a coat of straight resin to the wood. He spread the resin with a brush and used a heat gun held in his other hand to heat the resin. The heat reduces the viscosity of the epoxy, so you can get a much thinner coat with this technique.
After the layer of epoxy was painted on the wood, Charles put on the dry micro. When it was hard, he sanded it down with board sanders and sanding splines. When this was finished, he put down a layer of 1.5 oz fiberglass cloth and epoxy, using a squeegee to get the excess resin out-and I suppose he used the heat gun again to thin the resin. When the epoxy was hard, he squeegeed on a layer of Ultra-Build to fill the weave, let it dry and then sprayed on a coat of Ultra-Build and sanded that when it was dry.
Ultra-Build is a new product from U.S. Paint. Like their Awlquik, it is an epoxy-based primer, so you get better adhesion than with polyesters like Featherfill, and it goes on thicker-15-20 mils vs 2-3 mils for Awlquik.
Heating the epoxy to thin it out is a capital idea. Joel Shankle is just finishing up his Falco and looks at the almost empty 5-gallon container of West System epoxy and wonders how much of it he sanded away. Five gallons of epoxy plus a gallon of hardener is a lot of weight. You can easily lose sight of the weight added by paint. I'd venture a guess that we've had at least 5 Falcos fly with 70 pounds of paint on them. And there's an equal amount of area on the inside that must be protected as well. Aside from avionics, it is the weight of varnish and paint that makes up the difference in the weight of our Falcos.
If you are looking for a lightweight fiberglass cloth, Wicks carries a 1.5 oz cloth, or you can get a 2 oz cloth from Fibre-Glast Developments Corp., 1944 Neva Drive, Dayton, Ohio 45414. Telephone: (800) 821-3283. If you are doing a lot of fiberglass work, like making your own cowling, you should look into Fibre-Glast. They have a complete line of materials, equipment and tools. They have an excellent catalog, and they give prompt service.
|
From "Construction Notes" Falco Builders Letter, March 1987 |
Does everybody know about 3M Fine Line tape? Nobody, literally nobody, uses crepe paper masking tape any more for laying out paint stripes and edges. 3M Fine Line tape is the only thing anyone uses. It is a green tape that's similar to the familiar Scotch tape, but it's slightly stretchy and you can maneuver around curves with narrow strips. It comes in assorted widths from down around 3/16" to an inch or so. Available at auto paint stores, Fine Line tape is useful for masking when you varnish the interior surfaces of wing skins and spars.
And while you are in the paint store, consider picking up a hand masker. If you are going to paint your Falco, you'll need one and they aren't terribly expensive. It is one of the handiest devices I've ever seen. It is a hand-held device that dispenses masking paper with a crepe paper masking tape already on the edge. The masking paper is available in various widths-18" wide is a normal size. It is nothing more than a kraft paper in a roll. You shove the roll of masking paper on to a spindle.
The masking tape is pushed on to its own spindle, and the tape is fed on to the paper as you pull the paper out-half is stuck to the paper, and the other half of the tape is exposed. There is a long serrated knife to cut the paper with a yank at the wrist. Once you have put down the Fine Line tape, you can mask off an entire wing in minutes. I know you can also use newspapers and tape, but I'll take a hand masker any day.
|
From "Construction Notes" Falco Builders Letter, June 1987 |
Covering and Painting
Joel Shankle has just finished covering his Falco and reports
"I can't say enough good things about the West
System." Joel used epoxy and microballoons to fill
any low spots in the plywood and then sanded the micro smooth-being
careful not to scuff the plywood. Next he added the fiberglass
cloth and squeegeed the resin out so that was no extra weight.
This left a rough surface of the fabric. After the resin was hard,
he mixed up a cup of dry micro-resin and micro but a very dry
mix-and filled the weave. One cup did the entire wing.
Joel sanded the wing smooth and the next steps are Featherfill, sand, primer and paint. This is the normal process used on most fiberglass airplanes. Steve Wieczorek says that a better procedure is to first spray a very light coat of primer (1-1/2 to 2 mils-just a translucent haze) and sand this. This gives a better bond to the substrate. Then add a sanding primer like Featherfill, sand this smooth. Shoot the primer (do not sand this) and then shoot the final topcoat.
At Sikorsky they do not use Featherfill. Featherfill is a polyester, and polyester does not adhere as well as epoxy. Instead they use U. S. Paint's Awlquick, an epoxy sanding primer which sands as easily as Featherfill and has better adhesion.
|
From "Tool Talk" Falco Builders Letter, September 1987 |
There is an interesting zinc chromate primer available from Ditzler. Their DPE 1538 is a black primer that has all of the corrosion protection qualities of the usual green or yellow paint. It's perfect for pieces in the cockpit that you are going to paint black anyway.
|
From "Construction Notes" Falco Builders Letter, March 1986 |
Steve Wilkinson writes that he had trouble with the primer adhering to his instrument panel. He used a primer known as Ferrothane Surfa-Bond #52, a shake-and-spray primer intended for aluminum and galvanized metal surfaces. After he had the instrument panel finished-painted with a Citation-gray Cook & Dunn enamel and completely lettered-Steve found that the paint chipped off easily. He experimented with the lower center pedestal part of the panel painting the metal as received, carefully washing with detergent and hot water, and removing the entire alodine coating by scrubbing an area with Ajax. Only the Ajax-cleaned area held the primer.
First off, most spray can paints seem to adhere poorly, although I have friends who have used Krylon successfully. Some people say that a part should be painted within 24 hours of being alodined, which may be the case with some quirky primers. You will have good results if you use DuPont's Corlar primer, and it seems to make no difference if the alodining is months old.
|
From Falco Builders Letter, March 1985 |
There seems to be a continuing pressure from builders to simplify the covering process. The use of plywood skins on the control surfaces will greatly simplify the matter.
John Shipler has just finished covering his Falco with the epoxy and fiberglass method. He had previously built an airplane with the dope and fabric covering process. He said he found the fiberglass and epoxy much easier and quicker to apply. With dope, the fabric tends to create little bumps over globs of fabric cement, and he found the 2 oz. fiberglass cloth went on very smoothly and easily. This method seems to be winning the hearts of Falco builders.
Still, there are builders who are advocating leaving out the layer of fabric. There can be no question that this will be easier and quicker. With wood boats, the layer of fabric is considered essential in any area subject to abrasion. If you would like to experiment with omitting the fabric, I still think it would be a good idea to use fabric along the leading edges and around the firewall.
Dave Aronson makes no secret that if he had to do it over again, he would not bother with fabric. Tony Bingelis has stopped using fabric on his Falco and others have been talking about doing the same. This technique was pioneered on wood boats by the WEST system, a rather heavy system developed by Gougeon Brothers, Inc. If you are interested in this process, send $2.00 for their technical manual to Gougeon Brothers, Inc, 706 Martin, Bay City, Michigan 48706. Chem-Tech sells a similar manual for their T-88 and L-26 epoxy coating, send $2.50 to Chem-Tech Inc, 4669 Lander Road, Chagrin Falls, Ohio 44022.
These methods depend on the ability of epoxy to form a tough protective coating. The theory of using a layer of fabric is that if you get a small crack in the coating, the fabric will not crack. This extra insurance is something you will give up if you omit the fabric. How good is the finish? The fact is that no one really knows. I tend to pay more attention to the actual experience of owners than I do to the claims of manufacturers or of builders who have just painted their airplane. I would like to see an airplane flown for a few years and endure hard duty. My experience has been that the Imron paint jobs hold up very well, but you sometimes see cracks. If the epoxy on the wood continues to protect it, then all is well.
Recently I read about the finish used on the nice little ARV called the StarLite. On that airplane, they are applying a primer-surfacer like Featherfill on the wood to fill the grain, then using an epoxy primer and polyurethane enamel, such as Imron. I can't question that this is easy and quick, but I would like to see how such an airplane holds up flying in all types of weather. Perhaps for a fair-weather ultralight this finish system will work, but I have to question the wisdom of using such a system on a Falco.
Most of you probably know that polyurethanes are not good things to breath. You should definitely use a filtered mask. Breathing polyurethane mist can really ruin your day. Some painters don't use a mask, but Ray Stits says he has noticed a consistent personality change with such painters. There are other risks, John Shipler reported that a builder in his area used a polyurethane enamel while taking Tylenol. Apparently as a result of the combination, the fellow was paralyzed for 3 weeks.
|
From Falco Builders Letter, March 1985 |
John Oliver did some experimentation on the painting of the instrument panel. He settled on the following: prime with duPont 825S red epoxy primer, two coats of black Imron (for toughness) and two coats of Krylon No. 1311 Clear Matte to eliminate reflection. John tried to use a duPont flattening agent to remove the gloss from the Imron and eliminate the Clear Matte coat that is more brittle than the Imron. He used up to 25% of the agent, but still had too much gloss and white specks started to appear. He wonders if perhaps a better agitation of the mixture in the sprayer would have solved the problem, but three weeks of testing was enough.
This sounds like a good way to get a tough finish for your instrument panel. My only caution would be that the custom Letraset lettering that we supply with the instrument panel does not adhere well to a heavily plasticized surface, so you might need to put at least one coat of Clear Matte on the Imron before applying the placards, or perhaps buff the Imron.
For those of you that are interested, the paint that is used by Cessna on the Citation instrument panel is Federal Standard No. 595-36118. I am informed that any good paint store can make up or supply this paint. This is a standard matte gray paint used for many applications.
|
From Falco Builders Letter, June 2001 |
I was reading some of the articles in the Skunkworks section and skipped ahead to the painting section. I was reading about the various fillers such as dry micro used by a number of the builders to fill low spots in the surface of the aircraft.
I just got through repairing hail damage to the wings and fuselage of my Wichita spam can (Cessna 172) and found a great, easily sandable, epoxy-based filler for use on wood, fiberglass, metal, etc. The stuff is called Superfil and is marketed by Polyfiber (Ray Stits' old company).
Superfil comes in two parts and is mixed by weight two parts A to one part B. It contains no MDA, so it is supposedly non-hazardous. It is twice as strong as the stuff called Bondo yet is about one-third of the weight-15 ounces per mixed quart! It will not shrink which is important when you think about this stuff being underneath a $8,000 paint job. It sands easily (easier than most epoxy and micro concoctions) after curing for 12 hours at 77 degrees.
I intend to keep this stuff on hand for various light filling repairs. You might pass the above info on to some of the other builders.
Also, has anyone used Polyfiber fabric over the Falco airframe in lieu of the glass cloth? If so, what were the results?
Richard Dickerson
Richard, thanks for the information. The Polyfiber fabric (polyester-Dacron is duPont's tradename for polyester fabric) is intended for application with adhesive dopes and for taughtening with heat. It's a completely different process than 'fiberglassing' the outside of a wooden aircraft with fiberglass cloth and epoxy. You absolutely do not want to use any polyester fabric in the method that we use because of the lack of adhesion between the wood, epoxy and the polyester.
Indeed, because the adhesion is so poor, polyester is used in 'peel-ply' fabrics that are used in a fiberglassing process where you want to put a fabric down over a seam of fiberglass cloth. Once the epoxy has set up, you pull the peel-ply off, and that's not something you want to have happen to your Falco.
|
From Falco Builders Letter, September 2001 |
George Richards asks if most builders put a UV barrier on their Falco. The answer is that it's not necessary at all. When the fiberglass is the airframe, it's another matter, but that's not the case here. Just use primer and paint.
|
|
![]()