Notes & Comments
Tools
![]()
Notes & Comments
|
|
|
July 2002 |
Kerry Bedsworth tried to purchase the recommended Senco SJS stapler but found it was no longer available. Senco advises that the SJS is now the SJ10. The only change is in the casting, it was an aluminum alloy and it is now a composite plastic. For information on Senco staplers, visit their website at www.senco.com
|
From "Tool Talk" Falco Builders Letter, March 1992 |
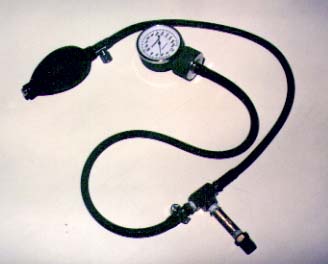
Our fuel tank pressure kit. I was surprised to read in Flying recently of Peter Garrison's account of damaging his altimeter to the tune of $300 and completely destroying a 700-mph airspeed indicator by using them as pressure gauges while leak-testing the tanks on his airplane. You typically pressurize a tank to 1.5 to 2 psi and then brush on soapy water and look for bubbles. The problem is finding a pressure gauge that will read such a slow pressure. By far the cheapest is found in a blood pressure test kit. They are sold at drug stores and other health care supply stores for people who like to take their own blood pressure to find out if they're going to pop off in the next few hours, or whether to go to the bingo game with their friends. Shown here is our rig which used the squeeze-bulb as a pressure pump. Our gauge shows the pressure in millimeters of mercury, but the conversion is easy: 1 psi equals 51.7 mm Hg.
|
From "Tool Talk" Falco Builders Letter, March 1989 |
We don't get many questions about saw blades, but I've been doing a lot of work at the table saw lately and have done some experimenting with various saw blades and bits for our pin router.
Pick up any catalog and all you can read about is carbide, carbide, carbide. Everyone is in love with the stuff, and you'd get the impression that everything else is obsolete. But when you start talking to the real experts in the router business they all talk about high-speed steel (HSS) for softwoods and many hardwoods. So who is right?
The primary reason carbide is used is that it is a very long-lasting tool. The material is tough as all-get-out, and it lasts much longer than steel. Whenever you are dealing with an abrasive material, such as plywood, you have to use carbide. On the other hand, HSS can be sharpened to a keener edge than carbide and the cutters are a third the cost of carbide-tipped cutters and a tiny fraction of the cost of solid carbide cutters. A HSS router bit will give a better cut in softwoods than a carbide bit.
Yet most people will tell you that a carbide saw blade gives a better cut. For the most part, this is true, and the reason is that a carbide-tipped saw blade is sharpened by grinding each tooth. Most steel blades have the teeth set-bent alternately to one side and the other. This is an imprecise business and just the tip of every other tooth carves grooves through the wood. This is not the case with a carbide blade, where each tooth is ground on the side so that it takes a nice square cut through the wood. Thus, it is the precise grinding on the side of the tooth that produces the finish, not the material.
But not all steel blades have the teeth set. Some are "hollow ground" and you will find that they will cut spruce nearly as well as the best carbide blade. And don't forget that spruce is relatively easy to cut with a saw. Most of the standard rules don't really apply to spruce, since it's so light, soft, resin-free and dry that you can rip with a crosscut blade all day long.
I have a Freud LU85M Telflon-coated 80-tooth crosscut blade, and there is no question that this blade makes the smoothest cuts in spruce of any blade I have tried. I use it for crosscutting spruce pieces and have been very happy with it. It is a very noisy blade, and it drums and vibrates to warn you that this saw can give you shortfingeritis. If you've just gotta have the best, this is it.
I also have a Freud LU84M 50-tooth combination blade, which is slightly less noisy and which is the best all-around blade to leave in your saw for everything.
You may be interested to know that Western Aircraft's Jean Peters and Trimcraft Aero's Francis Dahlman have never used, nor do they even own, a carbide blade. These two men have spent a lifetime cutting spruce, and they use steel blades. The simple truth is that if you use the right steel blade you don't need anything else, and they are painfully cheap.
The first blade that you should buy is a hollow ground planer blade. You can get one from Sears, Delta or your local hardware store. This is what Jean Peters uses the most.
Francis Dahlman was also very fond of the Sears thin rim satin cut veneer blade, and I heartily agree. This blade is hollow ground and has 200 teeth. With that many teeth, it's great for cutting thin spruce and birch plywood. The blade is hollow ground and thus produces a finish that is close to that of the best Freud carbide. The blade is limited to a 1-1/4" cutting depth, and I especially like it because it is easily the quietest blade I've seen. Compared to that howling banshee Freud, this blade barely whispers.
The big reason Dahlman and Peters use these blades is that they are thin and thus waste less spruce. When you are ripping spruce into capstrips, it is quite easy to have more than 50% waste. (Jean Peters has a secret weapon, a Hitachi resaw whose 80mm-wide stellite-tipped band saw takes a hair-thin cut through a seven-inch thick board of spruce.)
There are some thin carbide saws. Most are small diameter blades, and you want the maximum speed at the cutter for the best finish. I have a Piranha, and it is a rough cutting blade. Freud has recently introduced a series of thin kerf blades. I haven't tried one, but I doubt that they have anything to offer to us spruce-cutters. They are only slightly thinner-.090" vs .104"-and with 60 teeth the cross-cut LU88M can't cut as smoothly as the 80-tooth LU-85M.
The enemy of any steel blade is heat. Wood is such a good insulator that it is important to keep pushing the wood through the blade or the blade will quickly heat up-the heat goes out with the chip. This is easy to do with a saw, but more difficult with a router. The experts all say to use a HSS spiral bit for softwoods, and we found it was a disaster. Spruce splits so easily that you have to go very slowly when you are cutting 'up grain' and a HSS bit will be dull in 15 minutes of production work.
We have experimented with all of the most popular types of router bits and have found that a straight 5/16" carbide-tipped bit works best, but after an hour of cutting, the bit is worn out. This drove us crazy until we understood the problem. Spruce requires a very keen edge to cut cleanly. Our 'dull' carbide bits are still so sharp that you can drag the edge across your thumbnail and scrape a shaving off. This is the classic test for a very sharp blade, and yet the spruce wouldn't cut cleanly.
However when you look at the edge with an 8-power magnifying glass with the light in just the right direction, you can get a slight reflection off the edge. There is just the tinest radius on the edge, probably measured in millionths of an inch, but it's there. We bought a 600-grit pocket diamond file from Trendlines, and that does the job. A few minutes of stroking on the face of the cutter will restore the bit to the original sharpness.
My thanks to the many of you who sent in suggestions for the carbide sanding disk for a table saw. There are a number of rubber sanding disks offered in catalogs, but they lack the rigidity to the the sanding-to-a-pattern that I had in mind. George Barrett called to say that he had one of the things. He had bought it at Sears in the '60s and had only used it a few times, so he just gave it to me. It was still in the original box-a Craftsman Karbo-Grit sanding disk. It's a great tool for sanding spruce and it will never wear out, which is perhaps why they no longer sell the tool.
But as luck would have it, I dropped into Sears the other day and they have a new product in the saw blade department. It's a ten-inch sanding wheel for use on a table saw, functionally identical to the old Karbo-Grit but with a very high quality sandpaper bonded to each side. I tried it out and found it did a slightly better job of sanding spruce than the Karbo-Grit wheel. Obviously, the sandpaper will wear out in time, but I doubt that it would be soon. The sandpaper is what is sometimes called 'resin-bonded' which apparently makes it last many times longer than standard paper.
|
From "Tool Talk" Falco Builders Letter, March 1989 |
Terry Smith bought a Radio Shack coaxial cable stripper and reports that it is one great tool. It is very cheap ($3-4), looks like a piece of junk but works great.
|
From "Tool Talk" Falco Builders Letter, March 1989 |
In our construction manual, we give the model number of the Senco pneumatic stapler as J-1/2 stapler. Senco has a new series of staplers which supersede the older ones, and I recently bought one. The salesman talked in circles so much that I never could figure out what the new part number is, but there is only one stapler that shoots the fine wire half-inch-wide staples. This stapler is apparently a rather rare item. More popular is the stapler that shoots the 3/8"-wide fine wire stapler. This staple is exactly the same as the other, except for the crown width, and it is the stapler-of-choice for the upholstery industry. I bought one of these and can't see any big difference, so get the one that easiest to find.
|
From "Tool Talk" Falco Builders Letter, September 1989 |
John Devoe reports that he has found a type of Sandvik sander wonderful for float sanding. The Sandvik "system" is a rather hard rubber block shaped to fit in your hand and the base is roughly three by five inches. With this comes a supply of metal sanding plates, which are thin sheets of steel punched with sharp pins so that the raised metal makes an abrasive surface-a perfect sliding board for Jim and Tammy. These plates are already coated with adhesive so you can just stick them on the rubber block and go to work.
Since they were already sticky, John just stuck a bunch of them end-to-end on a smooth board and used it for float sanding. He said it worked well and that the plates cut spruce just as well as the D. G. Products carbide grit sheets but which do not have their own adhesive.
|
From "Tool Talk" Falco Builders Letter, September 1989 |
Gary Smith bought a Porter-Cable abrasive planer the other day and says it does a beautiful job with taking small amounts of spruce off the main wing spar and other places where he needs to get the shape of the structure just right for the skinning.
|
From "Tool Talk" Falco Builders Letter, September 1989 |
For more agressive removal of wood, Stephan Friend sent along an offering from the Australian Woodworker magazine of a unique device which I think Steve thought might appeal more to my warped sense of humor than to any of you. The device is called the Arbortech Woodcarver, and it's round piece of steel that mounts on an angle grinder. It's roughly four inches in diameter and much like a saw blade, except that the teeth are exact copies of the teeth found on a chain saw. It's handy for polishing fiberglass airplanes, carving totem poles, removing pavement, or just a massacree. You can get this lethal device from Arbortech Pty, Forrest Street, Nannup, Western Australia 6275 for fifty Australian dollars.
|
From "Tool Talk" Falco Builders Letter, September 1989 |
Dean Malstrom sent me a couple of sanding respirators that he has been using and which he likes. They are 3M Cat. No. 8654, Auto Part No. 3201 Sanding Respirator. These respirators are inexpensive paper face masks, but they are superior to the many other masks I have seen. The masks are made of multiple layers of paper and give excellent filtration of the air. There are two rubber straps which hold the mask on your face with real authority, and a ductile metal band is bonded in place so that you can insure a good fit at your nose. These masks are great for working in dusty environments and when you don't feel like breaking out the big rubber masks that you need for painting.
|
From "Tool Talk" Falco Builders Letter, September 1989 |
Gadget freaks might be interested in knowing about a new type of folding shelf bracket that was designed in Spain a couple of years ago and which is only just now being marketed in the U.S. The Draftsman's Bracket is a heavy-duty, chrome-plated steel bracket which is designed for mounting a draftsman's table to a wall. In the extended position, the shelf is held at 90° to the wall, and you can fold the shelf down by triggering a little pull-release mechanism. The two-position brackets are either open or closed. There are also a couple of four-position brackets which are intended for lowering a drawing board to a comfortable angle.
These brackets are exceptionally well built, hinged with pins and snap rings instead of the usual tubular rivets. It's also a beautiful piece of design work, certainly better thought-out than many aircraft retraction systems I've seen.
I'm interested in these brackets because I have an Excalibur fence on my table saw. It's one great fence, but it has a rail on the far side, and it's difficult to mount an outfeed extension table. I'm using two of these brackets to support an outfeed table and then I slide a filler strip in the gap. The brackets come in three sizes, nominally 15, 11 and 8 inches and two largest sizes support 176 lbs while the 8-inch size supports 55 lbs. The part numbers are 7154, 7152, 7114, 7112 and 7082-the middle two digits indicate the nominal inch size, the last digit is the number of positions.
These shelf brackets are imported in the U.S. by Spur Hardware, One Dunham St, Winchester, MA 01890 who sell only through distributors, but you can call them at 1-800-666-SPUR for the name of a dealer in your area. The dealer in Richmond was such an idiot-who first denied carrying the line, then put me on hold for five minutes before informing me they only had the 4-position model in stock-that I called back for the name of a mail-order outfit. I got my P/N 7152 brackets for $15.00 each from The Source in northern Virginia-703-644-5460 or 800-452-9999. You will probably also see these things showing up in various catalogs soon since all the mail order companies are taking a look at the things.
Even if you don't need them for your table saw, I can see that they would be useful for various purposes in a cramped shop. Spur seemed particularly concerned that they not be used where small children might crawl underneath them.
|
From "Tool Talk" Falco Builders Letter, September 1989 |
You may not have a need to cut a piece of wood at an angle of 0.296°, but I needed to make a lot of such absurdly high-precision angled cuts to make the jigs for the various wing and tail spars. I use blocks of 3/4" baltic birch plywood which are cut precisely so that they fit within the spars. These blocks locate the cross pieces and the spar caps at the same time. The wood has to be cut very accurately.
I make the jig board of 3/4" baltic birch plywood, cover it with white Formica and then I draw the spar on the Formica in ink, right on my drawing board using my drafting machine. (For the longer spars, I mounted a plotter pen on Gonzales and let the machine draw the centerline.) Then I cut long tapered plywood blocks to match the drawing on the Formica, mount them with screws and dowel pins, and then cut the long pieces into individual sections to fit between the stations.
The angle guide is an elegantly simple affair that took me longer to design than to make. There are two pieces of 3/4" baltic birch plywood cut to 3" x 30" and hinged at one end with a heavy-duty brass hinge. The hinge was important since it had to be no wider than the plywood and yet had to be fairly strong and rigid. My local hardware store clerk found precisely the right hinge, a fancy brass hinge used for reproduction desks.
I glued a piece of acrylic to each side of one of the pieces of plywood. These two pieces squeeze slightly on the other plywood piece and thus hold everything together. The angle is set by a quarter-inch jack-bolt, which I threaded full length, mounted in a T-nut. There's an acrylic wear plate for the jack-bolt. (I use a lot of acrylic in making jigs and fixtures. If you scuff-sand it, you can draw on it. It's easily cut on a bandsaw and sanded to final shape, and it is hard enough that it will withstand a reasonable amount of wear. It's also painfully cheap; I get mine by raiding the waste bin of our local plastics-supply company.)
I drew the indicator with our CAD system, using the radial duplicate feature, and glued the printed indicator to the acrylic. The cursor is another piece of acrylic that is mounted over the indicator and which is scribed and black-inked-which, by the way, is the way everyone makes a cursor. A spring hooked over two screws on the end holds the moveable part firmly against the jack-bolt.
I assembled the whole thing and zeroed the cursor on the indicator, and then did a couple of final clean-up cuts against the fence to insure that both faces were parallel. On the side that runs against the fence when cutting an angle, I actually cut right up until I was sawing the acrylic, so that I would have a hard, durable edge. Finally, I glued a push-block on the end.
The indicator is graduated in tenths of a degree and the device has proved to be astonishingly accurate. In more than half the cases, the initial angle setting is correct and needs no fine-tuning. I'm limited to about 5° on the indicator, and I wish I had more. I get around this limitation by keeping a few spare tapered blocks which are carefully marked with their degrees in hundredths of a degree. One, I remember, is for 1.76° and so if I need something around 6°, I just subtract 1.76° from the desired angle, set the angle on the cursor, then insert the tapered block between the jack-bolt and the hinged piece of plywood.
I wish I had a nice built-in way to hold the wood I am cutting firmly in place, because I end up working with my fingers closer to the blade than I like. If I were doing production work with this, I'd figure out something, but I use it so infrequently that I just rely on terror of the blade.
Except for the screws for the hinge, cursor and springs, the entire affair is held together with Zap-A-Gap cyanoacrylate glue.
|
From "Construction Notes" Falco Builders Letter, December 1989 |
Craig Bransfield recommends a Skil Model 7131 belt sander with a #97500 "support frame" accessory. Craig says, "This is a readily available sander, however none of the consumer outlets seem to stock the support frame, which is available direct from Skil at about $11.00 COD (allow about 8-10 weeks for delivery). I would not recommend using such a sander without a support frame or depth stop, due to a tendency toward rocking and instability. With the frame, however, the tool is very easy to handle reliably, and can be used for stock removal where the grain is not all unidirectional. Even the internal dust collection system works well. Be sure to clamp down your work piece, since the drag generated by the sliding belt is considerable."
|
From "Construction Notes" Falco Builders Letter, December 1989 |
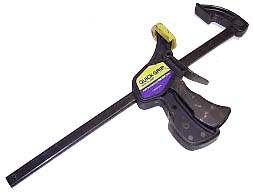
There is a new and very interesting bar clamp on the market-the makers of Vise-Grip have come out with the Quick-Grip bar clamp. Available in 12, 18, 24 and 36 inch sizes, the clamp is just like any bar clamp except that you only need one hand to use it. There's a pistol grip on one end that you squeeze to tighten the clamp. Very handy for those situations when you need an extra hand.
|
From "Construction Notes" Falco Builders Letter, December 1989 |
Is there anyone out there who doesn't know about drywall screws? This is one of the greatest inventions of modern times. These screws are wonderful for making jigs and general carpentry work. You normally install them with a Phillips head bit in an electric drill. The nice thing is that you don't need to drill a hole; you just lean on the drill and pull the trigger. They have a very sharp point and are case-hardened. These screws were originally developed to install drywall over sheet metal studs, but they have become so popular that people use them for everything. The other day, I noticed that my local hardware store is stocking self-drilling drywall screws. These have a tiny drill bit on the tip of the screw and, they drill their own pilot hole in thick metal.
These screws have created a huge market for electric screwdrivers, which in turn have created markets for other tools. The latest to appear is the Black & Decker pilot-point drill. These are ordinary high-speed steel drill bits intended for drilling into metal except that at the tip, rather than a normal vee-point, there's a tiny little drill to start the hole. Some are coated with titanium nitride which makes them gold in color and which makes the drill last longer and cut more easily. All of these things are intended to make the drills work better with slower-turning rechargeable drills. Gary Smith said he picked up one of these drills, spent the entire day drilling 1/8" holes in steel with the same bit, and was amazed to find it still sharp at the end of the day.
|
From "Tool Talk" Falco Builders Letter, March 1988 |
The other day I went to a woodworking show at our local convention center. A young friend later asked me if I had seen the Zyliss vise demonstation. He had been blown away with the demo and was hot to buy one.
If you have ever seen one of the demonstrations, you can understand the appeal. For five minutes you watch the man with the microphone do more things with the Swiss-made vise than you can imagine. One year at Oshkosh, the Zyliss vise man had the booth across the way from us, and I thought I had the whole razzle-dazzle routine memorized. I bought one and proudly brought my new find home.
I don't think I've every bought a more worthless tool, and for reasons I don't understand, I really don't hold it against anyone. I keep thinking that surely, this must be my fault. Every time I reach for the gizmo, I can't remember how that fast-fingered man did it. I literally saw the man clamp one of every conceivable shape and length, but I can never seem to be able to do any of these things.
My brother fell prey to the display and bought me one from Christmas. Now I have two, but this one is a "Profi-King Plus" with gadgets that turn your electric hand drill into a drill press, and disk sander. The other day, a friend stopped by to help glue up an extension table for my table saw. As always, the table was just an inch too wide for all of my clamps, so I reached for my trusty Zyliss and a two-by-four to make a bar clamp.
For the next ten minutes, I found myself engaged in a silly exercise which have made Woody Allen envious. We twisted and turned the vise every which way until we finally got it to hold on to one corner. Just long enough for me to grab a hammer and some nails.
I have since made a careful study of the manual for the Zyliss vice. It seems to me that if you have a work table of precisely the right thickness, it might make a reasonable lightweight vise for holding a piece of wood, but otherwise I don't see much use for the thing. A big cast-iron vise is a much better vise, and if you need a clamp, buy one. There are a hundred clamps which are more useful than this.
|
From "Tool Talk" Falco Builders Letter, March 1988 |
Also at the show I picked up a set of "cool blocks" for my bandsaw. I'd seen them advertised in woodworking catalogues. Mainly I was just curious what the fuss was all about.
My Rockwell bandsaw has four steel guide blocks which keep the saw blade in position. The blocks are held in place with set screws. The "cool blocks" are replacements for the steel guides, and they are made of graphite impregnated phenolic. The benefits of the blocks are supposed to be that you can adjust the guides closer to the blades so there will be less wobble to the blades and so the blades will run cooler.
Actually, I had never noticed the temperature of my blades, so I can't tell you if they do any good. After spending $10.00 on these blocks, I have felt compelled to follow the precise instructions of bringing the blocks down snug on a piece of paper against the blade. This way I have very little side-to-side wobble in the blade, but I can't really say if it's any better than before.
If you find yourself laying awake at night wondering if you have been running your bandsaw blades at too high a temperature, I think these little blocks are just the thing for you. But otherwise, I'd say hold on to your money.
|
From "Tool Talk" Falco Builders Letter, June 1988 |
In 1968 I bought a Buck knife for a hunting trip to British Columbia. It was one of those folding knives that was just big enough to be considered a concealed weapon, but I've always carried it in my pocket anyway. For the past twenty years, I've used that knife for every imaginable task. Skinning a bear in Alaska. Digging weeds in the yard. Hammering small nails. Changing a tire. Cutting down little saplings. Cleaning fish. Opening paint cans and boxes. And once as an intemperate bachelor I used it to pin a note on a neighbor's door to explain my position in a territorial dispute.
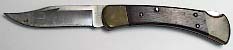
It was a beautiful thing with a brass-and-rosewood handle. The blade locked open with an authoritative click, and it took a hefty push to release the lock to close the blade. The blade always kept an edge well, but the thing that I always liked best was that it was just big enough to be useful for the heavy-duty nitty-gritty work. Then in February, while prying something apart, the blade snapped. I was really leaning on it, and I should have used a crowbar. Suddenly, I realized how much I depended on that knife.
Funny. I'd never before thought much about the old workhorse knife. It was one of those tools, like a hammer, that you just take for granted. Of all the tools in my shop, it was the one I picked up most often, and it was always readily available. I can't remember ever putting the knife in a drawer.
I don't know where I got the knife and had no idea where I could buy one, but I did find the address for Buck Knives in a Thomas Register. I sent them the broken knife along with a note to please send me the nearest equivalent and to charge it all to my credit card.
Two weeks later, I received a mysterious card with a number on the front and instructions to please refer to the number "when inquiring about your knife" and to "please allow four to six weeks." For what? They couldn't possibly be talking about repairing that knife. Could they?
Then three weeks later, a package arrived from Buck Knives. In it was a shiny new knife-almost exactly like my old one-and a note from the president of Buck Knives, Chuck Buck himself: "Please accept our apology for any inconvenience that may have incurred during the absence of your Buck product. We strongly believe that Buck manufactures the highest quality product available. We are always prepared to rectify the problem when one does not measure up. Thank you for allowing us this opportunity to correct this unforseen error."
My God. I beat the hell out of this poor knife for twenty years and then they apologize for the inconvience of being without my knife. They send me a new free knife and thank me for the opportunity to correct the error. And the whole thing was handled as a routine matter. I ain't never seen nothing like it!
All I can say is that my knife is better than your knife-unless yours is a Buck knife, too. The one I have is Catalog No. 382/Model No. 110, and if they can handle my problem, I'm sure they can handle your order-it's Buck Knives, Inc., 1900 Weld Blvd, El Cajon, California 92020. And if you don't need to skin a bear, you will still find it will add a subtle touch to your notes that even yuppies will appreciate. For genuine Rambo-grams, you'll need one of the larger models.
|
From "Tool Talk" Falco Builders Letter, June 1988 |
This is just too remarkable to fail to mention. With everyone using a water level to build the Falco, you may be delighted to know that you can now buy an electric water level. There is the familiar clear plastic tube filled with colored water, but there is a little yellow box that beeps at you when you reach the proper level. No mention of RS-232 is made, so apparently there is no way to interface this with your PC, but you do need to buy your own 9-volt battery. Catalog number SS62010 Electric Water Level is $29.95 from Trend-Lines (800) 343-3248.
|
From "Tool Talk" Falco Builders Letter, June 1988 |
To straighten out wood parts that take on warps over time, I found that the least expensive clothes steamers available at department stores (around $20.00) work best. I got the kind that does not have an electrically heated sole, on the assumption that I would get controlled temperature provided by the steam only and would avoid scorching the wood surface by hitting it "hot and dry". This should also work well for bending tip skins, etc. Be sure to use a kitchen mitt on your free hand!
Craig Bransfield
|
From "Tool Talk" Falco Builders Letter, June 1988 |
The Micro-Mark Tool Catalog (800-225-1066, or 340 Snyder Avenue, Berkely Heights, NJ 079022) features the #15119R "Multi-Saw", which is a small reciprocating table-top jeweler's saw. If you put in the very fine "metal"-type blade included, it cuts plywood very cleanly and fast enough to be satisfying. Price was last shown as $99.00.
Craig Bransfield
|
From "Tool Talk" Falco Builders Letter, June 1988 |
The Gougeon Bros. glue syringes do not come with any kind of stopper, which you'll need for Aerolite resin. You can use plastic 'wire nuts' for this, but first remove the copper or steel spring inside.
Craig Bransfield
|
From "Tool Talk" Falco Builders Letter, June 1988 |
Your local hobby shop which caters to the model airplane crowd will have a number of useful items, such as:
The Applied Design Corp. "Tee-Bars"-very flat aluminum extrusions in either 10-7/8" or 21-7/8" lengths. It so happens that two of the flat steel carbide abraders mentioned in the construction manual can be attached semi-permanently to the face of the long bar with 3M #77 spray contact cement, making a very nice long, straight sanding block that is easy to handle. For float sanding, you can put a piece of masking tape over the "tail" end, or you could easily attach the assembly to a longer board with a slot in one end and still remove it quickly if required. Cost is about $4.00 for the long one.
An X-Acto knife with the No. 11 small triangular blade is unbeatable for cleaning up notches for stringers, etc. Very sharp, strong enough to do the job on spruce and plywood, and totally ubiquitous. They also make nice small razor saws, etc.
For quick bonding of jigs and non-structural woodwork, try the high-viscosity cyanoacrylate glues such as "Zap-A-Gap" or "Super Jet". Expensive, but a little goes a long way. They also have an accelerator spray which will assist difficult bonds, and will even cure a fillet of the glue. Permanent bonds in 10-30 seconds after pressing parts together, so line them up well! Best results when wood is scuff-scanded, just as for Aerolite.
Craig Bransfield
|
From "Construction Notes" Falco Builders Letter, December 1988 |
If you have never used a router, a good book is Router Handbook by Patrick Spielman. This is one of the all-time best-selling woodworking books. Those of you who have the book can take a look at the C. R. Onsrud Model 2003 inverted router on page 179. That's what we have to make the solid spruce ribs in the wing and tail. Patrick Spielman's latest book on the subject is Router Jigs & Techniques which I've ordered. If you can't get them locally, you can get both from Highland Hardware at (800) 241-6748.
|
From "Construction Notes" Falco Builders Letter, December 1988 |
You can't beat the carbide-grit sanding sticks and sheets sold by D. G. Products for carving on spruce, but a neat little item are the Eversand hand sanding pads. The sandpaper is something called resin-bonded which is apparently longer lasting than ordinary sandpaper, and each pad consists of a 1/8" closed-cell foam core with sheets of different grit sandpaper on opposite sides. Highland Hardware-(800) 241-6748-sells a pack of 6 pads for $9.50.
|
From "Construction Notes" Falco Builders Letter, December 1988 |
I've mentioned this before, but lately I've gotten a number of calls from builders looking for a strut pump that they can use with their shop air. The pump is the 1500 psi oleo strut pump, manufacturered and sold by Aviation Products, 114 Bryant, Ojai, California 93023. Telephone: (805) 646-6042. The price of the pump is $195.00. It is a big piston/little piston affair that boosts the air pressure by a factor of ten, so 65 psi of shop air pressure puts out 650 psi of pressure to the strut.
|
From "Construction Notes" Falco Builders Letter, December 1988 |
I'd seen them in catalogs and hardware stores for years, but not until I picked up all the stuff from Francis Dahlman did I realize what a nifty device the Jorgensen bar clamp is. The clamp has a multiple-disc-clutch arrangement that is truly wonderful, and I wonder if I am the last person on earth to discover their benefits. I've owned other clamps which are built around the same idea of quickly sliding the clamp closed and then tightening the screw handle to put on the pressure, but they never worked as advertised. These clamps really do work well. The clutch holds any place on the bar without slipping and releases instantly with just finger pressure. So if you are getting tired of screwing, screwing, screwing your "C" clamp until you finally get it down to the workpiece and then discover that something won't fit and you need another clamp, take a look at these clamps. They come in every conceivable size from tiny to huge and are sold all over the world by hardware stores and mail order companies.
|
From "Construction Notes" Falco Builders Letter, December 1988 |
Does anyone know where to get a carbide grit sanding disk for a table saw? I've used them before and you would think you should be able to go down the the local hardware store and get one, but no one seems to have one. It is nothing more than a ten-inch diameter disk of steel that has been covered with a dusting of carbide grit which is brazed to the plate. They are inevitably coated with copper plating, and they sand soft wood like there's no tomorrow.
|
From "Tool Talk" Falco Builders Letter, September 1987 |
A tool that might be of interest is a Dremel table saw, it's a miniature version of a standard size table saw and uses a four-inch blade. It works great for all the fine cutting and does not eat a lot of wood.
Michael Head
|
From "Tool Talk" Falco Builders Letter, September 1987 |
Senco also has a new staple
gun, SJS-JG, which uses no oil and cost me $184.00.-Michael
Head
Michael Head
|
From "Tool Talk" Falco Builders Letter, September 1987 |
There are two ways of inflating the main gear oleo shock absorbers. The method used by most FBOs is to use a bottle of high pressure nitrogen. Nitrogen is used more out of convention than need. Some years ago military aircraft switched to nitrogen from compressed air since there were rare occasions where the struts would become very hot and the oyxgen/oil combination would detonate. (A shock absorber does not actually "absorb" energy, it converts the energy to heat.) The Falco shock absorbers see very light duty, so there is no need to use nitrogen-it's just the most common thing around.
If you can't get an FBO to give you a fill-up, and you want to have your own source of compressed air, you have two choices. First, you can buy your own bottle and pressure regulator. Second, you can buy a high pressure oleo strut pump. This is a simple pump that operates on compressed air from a normal air compressor, boosting the pressure by about 10 times.
There is no magic to it-it's just one of those big-piston-little-piston devices. To my knowledge, only one company makes this type of pump, Aviation Products, 114 Bryant, Ojai, CA 93023. Telephone: (805) 646-6042. Their "1500 psi Oleo Strut Pump" lists for $149.95.
|
From "Tool Talk" Falco Builders Letter, September 1987 |
If you haven't been able to find any transfer punches, Travers Tool Company sells them as "spotters". We've added the 3/16" and 1/4" models to the Travers Tool section of our price list. They also sell a set of 28 punches in an indexed stand, sizes 3/32" through 1/2" by 64ths, plus 17/32"-catalogue #71-600-028 for $17.95.
|
From "Tool Talk" Falco Builders Letter, December 1987 |
The sketch of the "Bushed Drill Guide" is a handy little gadget to be used whenever bolt holes should be drilled close to 90°-which is most of the time. The bolt hole should be predrilled in the metal part, the metal part positioned, clamped and the bolt hole spotted (shallow drilled) through the hole in the metal part. Remove the metal part, locate the bushed drill guide to the spotted hole and drill the bolt hole through the bushed drill guide. Those shown on the sketch are common steel inserts which should last more than the requirements of a Falco, but if the desire is to go first class, hardened steel bushings of the appropriate sizes are available from tooling supply houses like Travers Tool. They are called, appropriately enough, 'drill bushings' and should last several lifetimes.
Incidently, for best results, the length of the bushing-the contact length of the drill-should be no less than 4 times the diameter and no more than ten times the diameter of the drill. Personally, I prefer to limit this kind of drill bushing usage to 1/4" diameter.
John Rawlings
|
From "Tool Talk" Falco Builders Letter, December 1987 |
Dave Gauger reports that he found a wonderful tool to save himself from an embarrassing situation. Somewhere in the process of gluing on a tail rib, he got the rib out of alignment and wanted to remove it without destroying the rib or damaging the spar. He bought a No. 49107.02 Flush Cutting Saw for $32.95 from Garrett Wade (800-221-2442) which did the trick nicely. This is a Japanese dowel-cutting saw, and you pull to cut. The teeth of the saw do not have any set to them so they will not scar the surface of the spar and the thin blade will follow the surface of the spar. The kerf is almost paper-thin so there is a minimum of lost wood.
Highland Hardware has a similar, and probably identical, saw. Their No. 05.64.27 Flexible Flush-Cut Saw lists for $16.95. Highland Hardware, by the way, now has an excellent 80-page catalogue. Highland Hardware, 1045 N. Highland Avenue NE, Atlanta, GA 30306. Telephone: (800) 241-6748 or (404) 872-4466.
|
From "Tool Talk" Falco Builders Letter, December 1987 |
A lot of Falco builders have purchased moisture meters, and by knowing the moisture content of the wood you can avoid some frustrating experiences. While we have some mention of various companies in the construction manual, we don't recommend any specific models. We list four companies who manufacture these instruments, but most of what I have seen in advertisements and catalogues is for the two leading manufacturers, Delmhorst and Lignomat. Each company will sell you moisture meters direct, although the items are also available through mail-order houses.
First, lets review the Delmhorst instruments. The G-30 is their top of the line moisture meter. This is a serious industrial instrument with a large meter which indicates from 6 to 30% and requires a separate electrode.
The 4-pin electrode is the lumber-yard version and requires a mallet to drive the 5/16"-long pins into the wood. This electrode is primarily used for checking fairly dry 4/4 wood.
The 2-pin model, with 1-1/8" pins, is designed for checking stock of any thickness at any moisture content. There are a variety of insulated and non-insulated pins. The insulated pins will read the moisture content at any specific depth indicated by the built-in depth gauge. A 2-lb built-in hammer drives the pins in and back out again with minimal risk. This instrument seems to be a gross overkill for the Falco builder, but if you want one, Highland Hardware will sell you the G-30 meter for $200.00 and the 2-pin electrode for $45.00.
Next down the line is the Delmhorst Model J-1 pocket size moisture tester with a 6 to 30% range. The 2-pin electrode is an integral part of the instrument. Any of the external electrodes may be used, in such case the instrument must be ordered as J-1/C-167. Because of the meter movement, this seems to be the best Delmhorst meter for Falco builders. Trendlines (800-343-3248) will sell you the meter (their catalogue No. DEJC) for $149.95.
The Delmhorst Model J-88 is the least inexpensive, with the meter of the other versions replaced by a series of LED discrete step indicators for 6, 8, 10, 13, 15, 19, 22 and 25% moisture content. Highland Hardware will sell you one for $99.95.
For complete information, call or write Delmhorst Instrument Co., P. O. Box 220, Boonton, NJ 07005, telephone 800-222-0638 or 201-334-2557.
Lignomat's Mini-Ligno is a pocket tester with discrete step LED indicators for 6, 8, 10, 12, 14, 16, 18 and 20% for $110.00. The 2-pin electrode is an integral part of the instrument. The instrument has a two-position hardwood/softwood selector switch.
Lignomat's serious instruments are their Lignometers, and each version is available in meter or digital version. Of these, I'd suggest the digital version, Model H30d ($149.00) with a range of 4-30% with E10 Drive-In Electrodes ($52.70). The H30d has a selector switch for 4 wood groups. Obsessive Falco builders can spring for the automatic temperature compensating HT60 ($339.00 plus electrodes) or the HT100 ($440.00 plus electrodes).
Any company with a sales manager named Grete Heimerdinger has to know something about moisture in wood, so for complete information, contact Lignomat, P. O. Box 30145, 14345 NE Morris Ct, Portland, OR 97230 or call 800-227-2105 or 503-257-8957.
I subscribe to Wood and Wood Products, a furniture and cabinet industry magazine. One of the regular features is a questions-and-answers column with a noted expert. A surprising amount of the problems mentioned in the column come down to inadequate knowledge of the moisture content of the wood the shops are using. Martin Guitars actually has an entire system of humidity and temperature controls-alarms go off if the humidity gets out of the desired range.
Trying to control the moisture content of the wood for your Falco may be like giving hand signals to a blind man, but you can avoid distressing situations by knowing the moisture content of the wood. If you skin with too-dry plywood, you can end up with dips between the ribs-look at the wing on the Corporate Disgrace.
It does pay to have some idea of what you are dealing with. The discrete step indicators are all you need to stay out of trouble. For more accurate information, I'd suggest the Delmhorst J-1 or the Lignomat H30d.
|
From "Tool Talk" Falco Builders Letter, March 1986 |
My advice to anybody considering building the Fine Woodworking handy-dandy breadboard moisture meter is, forget it. The thing is labor- and money-intensive enough that it could only appeal to the kind of dingie that would build a $50,000 airplane out of, oh, let's say wood, in order to save money. Crazy.
I tried it and spent not the $30 the magazine said it would
cost but more like $40 by the time I was through getting a little
box to put in into, a cheap plastic screwdriver to cut the handle
from in order to make a probe, and a few other little things-to
say nothing of about 20 miles of driving to two Radio Shacks to
round up the materials plus a third trip by Susan to an electronics
store in the city for an IC.
Did the thing work when I was done? Nope. Deader 'n (bleep). Not a flicker. Could have been my soldering skills, which are ordinary but sufficed for several Dynakit amps and tuners. Could have been a 10-cent Tandy diode or resistor made in Singapore and I'm sure subject to probably a five-percent mortality right out of the box. Could have been a microscopic arc of solder that bridged a circuit. But the end result was $40 wasted trying to make a device that I can buy for no more than three times that amount.
Steve Wilkinson
|
From "Tool Talk" Falco Builders Letter, June 1986 |
One accessory that I am finding increasingly invaluable is my miter box. By "miter box" I don't mean one of those maple racks with sawcuts in it that will locate a saw at 45° and 90° angles to the piece of wood, or a hardware-store item that is used with an ordinary backsaw, but a high-quality European metal miter box with its own dedicated saw and a dead-accurate swivel that will locate the saw at any of an infinite number of angles between 45° and 90°.
I use mine constantly, and not just for mitering. They're terrific for cutting standard corner blocks, splendid for making odd-angled corner blocks like the ones where the spars meet the wingtip bows and just fine for making ordinary right-angle cutoffs-for one thing because the saw makes an absolutely square, perfect cut and for another because it's thinner and finer than any backsaw-it's sort of like a hacksaw for wood-and it goes through spruce like a hot wire through foam-core, to use perhaps your least favorite image. I never make a cutoff without using the miter box any more: it's safer than firing up the table saw and easier and more precise than putting a pencil-marked piece in a wood vise and hacking away with a backsaw.
These miter boxes are almost invariably made either by the West German Ulmia or the Swedish Nobex companies and appear in virtually every fine-tool catalogue for anywhere from $90 to $150. Oddly enough, the usually overpriced Garrett Wade (161 6th Avenue, New York, NY 10013, 800 221-2942) has a good price right now ($99.75 for the medium-size Nobex), but The Fine Tool Shops (20 Backus Avenue, Danbury, CT 06810, 800 243-1037) sells the same tool for $89.75, which is the lowest price I've seen.
Steve Wilkinson
|
From "Tool Talk" Falco Builders Letter, June 1986 |
Second verse: D. G. Products, the company that makes those Perma-Grit carbide sanding tools you recently recommended, has just come out with flexible 2" x 11" x .008"-thick steel flats with tungsten carbide grit brazed to them in 120 and 60 grit flavors. I haven't tried these units, but their regular tools are wonderful. They remove wood faster than any file or sandpaper of equivalent roughness, and these new units sound like they'd be perfect for indestructible, virtually permanent float-sanding units, especially ganged together end-to-end to create a 22" sanding surface that wouldn't be prone to the kind of torn edges and ripped corners that seem to afflict paper-faced float-sanding sticks. D. G. Products, Box 292443, Dayton, Ohio 45429. PXT-103 is the tool in 120 grit, FXT-104 is 60 grit. They retail for $6.95 each, though they may still be available at the introductory price of $4.95 each, two for $7.90 plus $1 per order postage and handling.
Steve Wilkinson
|
From "Tool Talk" Falco Builders Letter, June 1986 |
Richard Clements reports that every Falco builder should have a Black & Decker Dustbuster -- if only to keep your co-head of household happy.
|
From "Tool Talk" Falco Builders Letter, June 1986 |
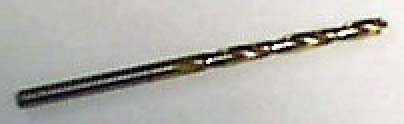
By now, every Falco builder should know about brad point bits. I don't know that you need them, but now a company is offering 10" long brad point bits. Catalogue No. 71886 is a set of 5 bits, 3/16"-1/2" for $24.99. Catalogue No. 71746 is a regular length 7-piece set, 1/8"-1/2", for $9.99. Catalogue No. 71795 is a regular length 4-piece set, 5/8"-1", for $29.99. DRI Industries Work Shops, One Work-Shops Center, Box 28114, Warrensville Heights, OH 44128. (800) 372-5282 or (216) 831-0283 in Ohio.
|
When we call that 800 number, we get Sears, and the toll number, we get what sounded like "Jenco." Do you have an updated number for DRI? -- Joel Kugler Sorry, this is all news to us. -- Alfred Scott |
|
From "Tool Talk" Falco Builders Letter, September 1986 |
My tool talk involves the discovery of an excellent float-sanding device, vastly better than the auto-bodywork sanding tool I'd previously touted. DG Products (Box 292443, Dayton, Ohio 45429, 513-294-1192) makes a line of Perma-Grit lifetime sanding tools that I use (tungsten carbide grit bonded to metal flats and various-shaped round and curved stock), and they recently introduced a new super-thin set designed to be affixed to sanding blocks. The steel stock to which the carbide is bonded is only .008" thick, so it's thinner than sandpaper.
I bought four flats-two of 120 grit, two of 60 grit-and glued each pair side-by-side to its own sanding board about 30" long and 4" wide, after sanding just the slightest depression in the area of the board to which I glued the steel tools to compensate for their very slight thickness. (Each of the Perma-Grit pieces is 2" wide and 11" long.) I then put a pair of drawer-pull knobs on the back side, one near each end-you can use any kind of convenient hardware-store handle, pull or knob-and it makes a convenient-to-hold piece that chews into spruce like nobody's business. It removes wood far faster than any sandpaper of equivalent grit, and it has none of the problems of paper-no lifting of the corners with consequent ruining of the entire piece if you catch the lip of the paper, no tearing of the edges, etc.
If you try to glue the tools on the wood with epoxy, by the way, be sure to first remove the paint on the back of the tool.
The items are FXT-103 (120 grit) and FXT-104 (60 grit). I'd order two of each and mount them side by side. DG Products' special mail order price "Good For You and Your Friends," according to the most recent flyer I got, is any two of these tools for $7.90 (normal retail price $6.95 each) plus $1 postage per order. Any friend of Frati's is a friend of mine, so go for it.
Steve Wilkinson
|
From "Tool Talk" Falco Builders Letter, September 1986 |
A growing number of Falco builders are now using moisture meters to ensure that the plywood is the proper moisture content before skinning. I'm not up on which exact make-and-models are being used, but the one I'd suggest is the Gann Electronics meter with the digital LCD display. Gann Electronics, 12265 West Bayaud Avenue, Lakewood, Colorado 80225.
|
From "Tool Talk" Falco Builders Letter, September 1986 |
Bill Wink and several other Falco builders pointed out the inexpensive KWB plastic dial calipers being sold at Oshkosh. These Swiss-made measuring instruments are surprisingly nice and just the thing you need for checking the thickness of plywood and pieces of spruce. I bought one and now have a second one thanks to the generosity of Bill Wink. Jerry Walker has used one for a year now and likes it. These calipers look just like a normal caliper, but they are molded plastic with 65% fiberglass-probably made from re-cycled Bisquick bombers!
There are three models: P/N 5921 is the metric one you want with 0.1mm dial graduations, P/N 5932 is the inch equivalent with .001" dial graduations, and P/N 5941 is a forgetable mixture. At $16.50, plus 1.50 postage and handling, they are a bargain. USA distributors are Swiss Precision Instruments, Inc., at three addresses: 450 Barrell Avenue, Carlstadt, N.J. 07072; 2206 Lively Blvd., Elk Grove Village, IL 60007; and 2425 S. Eastern Avenue, Los Angeles, CA 90040, or General Hardware Mfg Co., 80 White Street, New York, N.Y. 10013. Include the appropriate sales tax if within the state. Bill Wink also supplied me with the name of: Accurate Tool Supply, 1675 Shoreline Road, Hartland, MI 48029. Telephone: (800) 544-1574 ext. 764. European builders may write Kunstoffwerk AG., 9470 Buchs, Switzerland.
|
From "Tool Talk" Falco Builders Letter, September 1986 |
I was in an auto paint store the other day and noticed that 3M now makes their Tri-m-ite open coat sandpaper in three (or was it four?) inch wide rolls. If you are using sandpaper for making sanding sticks, this seems ideal.
|
From "Tool Talk" Falco Builders Letter, December 1986 |
Builders making their own fuselage frames may be interested in the Performax S/T, a drum/thickness sander attachment for radial arm saws. To set it up, you take off the saw blade, and replace it with a pulley that belt-drives the sanding unit at 1200 rpm. The sanding unit attaches to the column tube of the saw with a quick-action clamp, then you put on the drive belt and tension it by rotating the saw motor carriage. Boards are fed from the right side of the saw, against the drum rotation.
The sanding drum is a 5" diameter by 22" wide drum which rolls on one-inch self-aligning ball bearings. The three-inch-wide sandpaper strips are supplied in a roll and wound around the drum in a spiral. Because of its open-sided design, you can sand surfaces up to 44" wide and up to 3" to 4" thick depending on your saw model. The sandpaper is available in 30' rolls for ($12.50) in 36, 80, 120, 180 and 240 grit. The Performax S/T is available for $179.95 plus shipping. For more details or to order, contact Performax Specialty Products Co., 17065 Judicial Road, Lakeville, MN 55044.
|
From "Construction Notes" Falco Builders Letter, December 1986 |
Falco builder and surgeon Dave Gauger writes "I've found that a six-inch Mayo Hegar Diamond-Jaw 32-0120-1 needle holder works well for grasping and pulling staples. The needle holder is what we use in the operating room to sew with. It looks like a big hemostat with shorter, stouter jaws, lined with diamond-shaped teeth that are designed to hold a needle firmly without twisting. They cost about twenty dollars for a good cheap pair."
|
From "Tool Talk" Falco Builders Letter, December 1984 |
We have failed to point out the need for transfer punches in the past. A transfer punch is a specialized type of center punch, but it exactly fits inside a hole. If you have already drilled a hole, say 1/4" diameter, and want to drill a matched set of holes through another piece, you would use a 1/4" transfer punch which would center-punch the exact center of the hole.
Transfer punches are used any time you are drilling through wood into metal. The six anchor plates on the aft face of frame No. 1 and the three seat belt anchors on the forward face of frame No. 6 should be drilled on a drill press after using a transfer punch to locate the holes. If you do not use a transfer punch, you run the risk of having the drill wander on you. This happened to Joel Shankle recently on the installation of the nose gear upper drag strut supports. You will need a 3/16" and 1/4" diameter transfer punch. You should be able to get one at a local machine shop supply company, or you could order them from Travers Tool.
|
From Falco Builders Letter, March 1985 |
I recently became aware of the fact that many of you are not familiar with a tool known as a "transfer punch". A transfer punch is a specialized type of centerpunch, designed to fit snugly inside a hole. You will need a 3/16" and 1/4" diameter tranfer punch when you build the Falco. Whenever you drill through wood and then into steel or aluminum you should use a transfer punch.
For example, when you install P/N 720 engine mount lugs or
the nose gear upper drag strut supports on the firewall frame,
you have to drill through the wood and then drill matching holes
in the steel backing plates. If you attempt to drill through the
steel plates, the drill will wander and make a horrible mess of
the hole. The proper solution is to drill through the wood only,
without the steel plate in place. Then, clamp the steel plate
in place and use the transfer punch to locate the center of the
holes. Drill the holes on a drill press and install on the airplane.
The seat belt mount fittings are also drilled in this same manner.
You should be able to purchase these transfer punchs at a local
machining supply company, or you can get them from Travers Tool
Company.
|
From Falco Builders Letter, September 1985 |
Falco builders who have Disston Abraders swear by them, and other builders report they can't find them. Jim DeAngelo has used a similar product for three years and reports that they work great. Manufactured by D. G. Products, Co., 209 Carrlands Drive, Dayton, Ohio 45429 (513) 294-1192, the sanding tools are made of heavy gauge steel with tungsten carbide grit brazed on. Prices are suggested retail, but may be purchased direct from D. G. Products for 20% off postpaid in the U.S. The following models are available:
Tool No. Description Price
F-100 1.5"x9" flat. Grit on one side. 1/2 coarse, 1/2 fine $6.95
F-101 1.5"x9" flat. Grit on one side. Fine grit full length $6.95
F-102 1.5"x9" flat. Grit on one side. Coarse grit full length $6.95
R-200 3/4" radius. Grit on one side. 1/2 coarse, 1/2 fine $6.95
R-201 1/8" tangent radius tool. Grit on one side. 1/2 coarse, 1/2 fine $6.95
R-202 3/4" diameter round tool. Coarse grit one side, fine grit opposite side $6.25
R-203 1/2" diameter round tool. Coarse grit one side, fine grit opposite side $4.95
R-204 1/4" diameter round tool. Coarse grit one side, fine grit opposite side $4.95
The tangent radius tool is bent to a 70° included angle with a 1/8" outside radius at the bend.
|
From "Tool Talk" Falco Builders Letter, September 1985 |
Steve Wilkinson reported that he had purchased some board sanders from Eastwood Company, 147 Pennsylvania Avenue, Malvern, PA 19355 (800) 345-1178. These are ideal for smoothing microputty and are standard equipment at all body shops. You'll find that most auto paint stores sell them. The sander has a wood handle and uses 2-3/4"x17-1/2" sandpaper strips which are retained by quick-acting clamps. In case you don't find one locally, the one you want is Eastwood's P/N 6317 Large Board Sander, and they sell paper in 36, 40, 80 and 240 grit. I've been able to get 120 grit locally in Richmond, and I get the sandpaper is boxes of 50 sheets. Steve plans to mount one in a yard-long piece of hardwood to use for float sanding, but I am pessimistic about this idea since the bottom of the sanding board is rubber covered-but it might work.
|
From "Tool Talk" Falco Builders Letter, September 1985 |
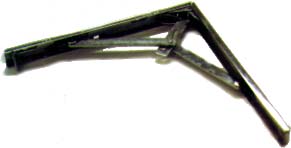
Thought maybe some other builders might be interested in the enclosed "El Cheapo Clampo". I was too clumsy to staple or nail the wing rib gussets in place so I spent an afternoon making these things, and they worked great (at least for me). Made a total of 69 (37 large and 32 small) in about four hours and at a cost of less than $10.00. To date have used them only for gluing the wing rib gussets and panels but will find other uses during construction, I'm sure.
Ron Sorensen
Ron Sorensen's clamp is a brilliant, elegantly simple design. It is made from a piece of wood 1.25"x.75"x8". You drill two 1/2" diameter holes, saw it down the middle and then bandsaw it as shown. A short piece of 1/2"Ø wood dowel is used as the "hinge bolt", and rubber bands are wrapped around it to provide the clamping pressure and to keep the pieces from falling apart. This concept can be easily developed to include a bolt and wing nut for greater clamping pressure.
|
From "Tool Talk" Falco Builders Letter, September 1985 |
Cheaper yet is Jonas Dovydenas's method of clamping his leading edge strips in place. He simply looped a string over the leading edge strip. One end of the string was tied to a nail driven into the table, and the other end was tied to a very large bolt which was used as a weight. What the hey... it's simple, and it works.
|
From "Tool Talk" Falco Builders Letter, September 1985 |
And for his water level, Jonas writes, "Easy way to make a water level: get a male and a female Gilmour Posi-Clamp hose end for 1/2" hose and attach to some 1/2" vinyl tubing (transparent, of course). Then get lengths of garden hose, as needed, and attach tubing to each end. When you're done with the plane, you can go back to watering the lawn."
|
From "Tool Talk" Falco Builders Letter, September 1985 |
I don't have much to contribute to the cause as do many other builders, who tell about clever methods of sawing tapers, applying skin and clamping ribs. These schemes have been a big help to me. Being possibly the oldest Falco builder-I should be the smartest-instead of the dumbest. Only one means of showing up all of those smart guys would be a staple-pulling contest. One of the things I learned on the Eastern Shore is how to use an oyster knife. By inserting the rounded and sharpened end of any oyster knife under the staple-and a quick twist of the wrist-the staple is flicked out-with no tell-tale marks on the plywood!
Allan Hall
|
From "Tool Talk" Falco Builders Letter, September 1985 |
The July/August issue of Fine Woodworking had an article on building your own wood moisture meter. It costs about $30.00 and is made from parts purchased from Radio Shack. Steve Wilkinson also spotted the article and is going to make one.
|
From "Tool Talk" Falco Builders Letter, December 1985 |
The latest newsletter mentioned once again the Disston Abrader. This is a fine tool, but to my knowledge it has been discontinued by Disston. Stanley Tools has recently introduced similar grit blades for some of their Surform tools. I purchased one 1-5/8"x 5-1/2" blade to fit the #399 Pocket Plane, and one 1-5/8"x9-3/4" blade which fits either the #285 File/Plane or the 9" file. The blades I purchased were listed as 80 grit, and appear to be carbide grit bonded to a steel substrate.
William Slaughter
|
From "Tool Talk" Falco Builders Letter, December 1985 |
I am enclosing an AMT catalogue (American Machine and Tool Co, Fourth Avenue and Spring Street, Royersford, PA 19468, phone 215-948-0400). I bought the scroll saw (page 15), the sanding drums (page 6) and the caliper set (page 5). Great tools... good quality for the price.
Jerry Ward
|
From "Tool Talk" Falco Builders Letter, December 1985 |
I drill holes with a brad point bit, using high speed and slow feed. This gives a very smooth hole. The brad point bid will not wander through the grain like normal bits. This bit will, however, cause quite a lot of splintering as it comes out, so be sure to use a back-up block. After drilling holes, make sure everything fits, if drilling for hinge fitting or other hardware. Using a cotton swab, coat the inside of the hole with epoxy glue or resin, wait about two hours and add another coat of resin... stick a waxed bolt, with threaded portion sawed off, through the hole and allow resin to cure. Instead of a bolt, a drill bit blank works well. After rhe resin cures, give the bolt a twist and remove it. A look through the resultant hole is reminescent of looking down a gun barrel. I have not tried this procedure with polyurethane varnish, but it will probably work equally well.
Jerry Ward
|
From "Tool Talk" Falco Builders Letter, December 1985 |
John Oliver reports that Leon Slocomb lent him a pneumatic staple gun, which he is finding a wonderful tool to have while skinning. He also did some experimenting with the best material to staple through. He found that it was best to staple through a scrap strip of birch plywood and then through nylon banding-the type used for straping crates and heavy boxes. When the glue is dry, the nylon banding is strong enough so that you can pull all of the staples out in one swift yank. John tried fiberglass-reinforced strapping tape and found it did not work.
|
|
![]()