The Main Wing Spar
![]()
The Main Wing Spar |
|
|
From "Construction Notes" Falco Builders Letter, March 1987 Here is a quick-and-dirty description of the method Norbert Kramer used to make the main wing spar. Norbert is a woodworker from way back and managed to complete the spar in record time. This method is similar to the way many builders have built the spar, but there are a number of simplifications. It's the best method I've seen so far. |
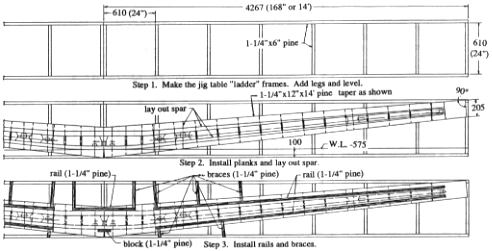
Norbert used 1-1/4" x 12" x 14' pine boards which he planed smooth and all to the exact same thickness. He used these boards for the jig table and for the jig itself. The jig table actually consisted of two 14'-long "ladders" and to make them he cut the lumber to a 6" width. The cross-members were spaced every two feet and the entire ladder affair was assembled with drywall screws. The two ladders were then joined end-to-end to make a 28'-long table. Legs were fitted and the table was carefully leveled with a transit, although a water level can also be used. It is absolutely essential that the table be level and flat, or you will have a bow in your spar.
The entire jig was assembled with 3-1/2" drywall screws. Drywall screws are a unique and extremely handy type of screw to have around for general jig building. The screws have a "bugle" head which is a flat head with a horn-like flare instead of the usual angular countersink. They use a Phillips screwdriver. Intended for attaching drywall to sheet metal "studs" without drilling a hole, the screws have a sharp point, deep knife threads, and they are case-hardened. It is nearly impossible to break one of these screws, and they get a better grip in wood than Israelies in occupied lands.
If you use a lot of these screws you will want to get a screwdriver attachment for your electric drills, so you can run the screws in easily. Norbert has an electric screwdriver with an adjustable clutch, but that is something he uses every day in his work.
Norbert used a nylon line to locate the base line (W.L. 575) on the ladder frame. Then, on top of the ladder frame, Norbert installed two boards. These were placed in a shallow "V" to comply with the dihedral. Taper the boards as shown in the sketches so that your clamps will reach. If you need more room, don't hesitate to cut a notch. One of the beauties of this "open" framework is the ease with which you can clamp.
Next, he laid out the entire spar. All of the station lines will be covered up when you make the spar, so the lines must extend to the edge of the planks which make up the top of the jig table.
The spar was built with the forward face up, and the booms were laminated against wooden rails attached to the jig table. The rails are made of the 1-1/4" pine which is cut to the thickness of the spar, plus a little to compensate for the thinner plywood on the aft face of the spar outboard of Sta. 7.
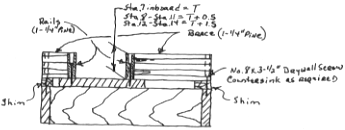
Norbert screwed the rails to the top of the table. At the inboard ends, he used several rectangular braces to keep the taller rails square. He used spacer blocks of 1-1/4" pine between the ends and the ladder frame. It's best to offset these braces a little from each station so you don't cover up the station centerline. All of the braces were the same height. This created a handy flat place which you'll understand in a minute.
The upper spar boom requires three rails, a short one in the center of the fuselage and one at each wing. There is a short opening at the bend just inboard of Sta. 1. You need the braces installed very close to the ends, or the laminations will take a "short cut". The bottom boom will take the smooth bend shown in the drawing, but it's a good idea to have a block in place so that you are sure you have the right dimensions.
Since you aren't likely to get any spar-quality spruce in 26-foot lengths, you must scarf and glue shorter pieces into long boards. Norbert assembled each board-one at a time-on top of the jig. He used a 15 to 1 scarf and the resulting 150mm is almost precisely the width of his 6" stationary belt sander. He clamped an angled block to the sander and used the "pencil sharpener" method-jamming the board into the sandpaper. Other builders have used this method for the laminating strips for the fuselage frames, but this is the first I've heard of anyone scarfing spruce this way. What the hey... it's quick.
Norbert used six-inch wide spruce. Although the spar laminations end up as about 3-7/8" clean, there's much less waste with six-inch spruce. Since the rails are the height of the completed spar, Norbert put the pieces in the jig and marked the pieces to match the height of the rails. This made the spruce a little too wide as is required for trimming and cleaning up-ideally you would like about 4 to 5mm of extra. After bandsawing off the extra spruce, the off-cut could be flipped over and used on the outboard end of the spar. If you used four-inch boards, the off-cut would be too small to be usable.
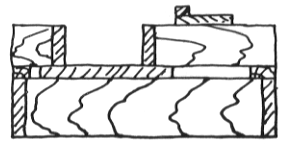
To insure that the scarfed-together boards were straight, Norbert screwed a very straight strip of pine on a five-foot-long board. He placed this on top of the braces and glued the scarf joints together there-covering them with wax paper and clamping. After scarfing, each board was glued together and set aside for assembly.
When all of the laminating boards were assembled, Norbert glued the upper spar boom together in the jig. To keep the glue from sticking, he lined the jig with wax paper. This can be stapled in place and after you finish gluing, rip the stuff out and replace it with new paper. It's important to get the wax paper smoothed out and stapled down during laminating-you don't want a crease to get caught between layers of the wood. The wax paper should not only cover the bottom of the jig but should also come up the sides.
Any time you glue, the glue will squeeze out. If the glue doesn't have anywhere to go, you will be fighting hydraulics, and the pressure of the glue will cause the bottom of the boards to be uneven. To prevent this, Norbert cut little strips of tempered Masonite, 1/8" thick by 1/4" wide, and put these under the wax paper. These shims raise the wood and give the glue a place to go, while still providing a flat bottom for the part.
Since he didn't have the temperature for Penacolite, Norbert used Aerolite and only glued one board at a time-but Norbert is fast with clamps! Most builders use resorcinol and with its longer working time you can glue all of the boards at once.
You don't have much time to work with Aerolite, so Norbert set all of his clamps up in advance so that they only needed a couple of turns. In all he used 72 clamps to make the spar. He bought forty six-inch clamps from Fine Tools. These are the slide-it-home and twist-the-handle type of clamp. He also bought 25 Jorgensen light duty bar clamps of 18" and 24" sizes.
The upper spar boom was the easiest since the Aerolite didn't start to set until the boards were pulled together-something the boards won't do until you clamp them. The opposite is the case with the lower boom, and you really have to move fast.
When the spar booms were completed, Norbert took each out of the jig, turned it over and made a couple of passes with a Makita electric plane (he has two: a six-inch and a three-inch) to clean the glue off the aft face of the spar boom.
The next step was to plane the inside face of the spar boom to the correct taper. You must measure and mark the s and i dimensions, but note that the booms are not a straight taper. Use a straightedge or a chalk line to snap the lines. Draw the trim lines on both sides of the laminated boom and plane the inner face.
To do this, Norbert placed a board on some sawhorses. He cut and planed two tapered strips of pine and screwed them to the board on each side of the boom. These serve as mini-rails, to hold the boom from sliding sideways and to indicate the desired thickness. Because of the dihedral, you can only work on one side at a time. The other end droops to the floor-or is propped up, depending on which boom you have in hand. Using his six-inch Makita electric plane, Norbert planed the boom down even with the rails. You must clamp the boom to the board so that a section will not bow up, and this means you can only plane a section at a time. You can also use the router method described below.
The simplest way to cut a taper is to tack the strip to a wide board, but at a slight angle so that the trim line is parallel with the far edge of the wide board. Push the whole shee-bang through a table saw with the edge of the wide board against the fence-and there's your taper.
Next Norbert assembled the plywood for the aft face. He did this in the jig, between the two rails for the booms, covering up the plywood with wax paper and an extra layer of plywood and then stapling right through. Because the plywood is of different thicknesses, he used plywood shims under the wax paper to bring the "upper" face of the plywood to the same level. As you will see, the spar booms will be glued to the aft face plywood in the jig, so the plywood shims must cover the bottom of the jig-strips would result in uneven gluing pressure.
Norbert first cut the plywood slightly oversized and cut the scarf. Then he trimmed the plywood to fit exactly in the trough of the jig. This is actually a simple thing to do-you just place the plywood on top of the rails, and you reach under with a pencil and mark the underside. Then use a straightedge to draw the cut lines.
Next Norbert glued the upper spar boom to the plywood for the aft face. This was done in the jig, of course.
The next step was to cut and fit the blocks and braces that go between the upper and lower spar booms. He clamped the lower boom in the jig and fitted the blocks. It's simple to get the size, just take two rectangular pieces of plywood, jam one against the upper boom and the other against the lower boom. Clamp the two together, and you have an exact pattern.
Norbert removed the lower boom from the jig. He removed the lower boom rails and braces from the jig table, and glued the blocks and braces in place on the upper boom and aft face plywood. Finally, he glued the lower boom in place. Norbert then "varnished" the inside of the spar with West System epoxy.
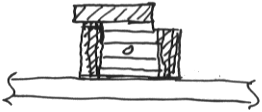
The next step was to plane the forward face of the spar to the final thickness in preparation of gluing on the forward skin. Because the Makita electric plane will just chip up any cross-grain, Norbert clamped a board on the spar as a fence for the plane. This let the plane cut about 1/8" into the blocks, but that will not cause any chipping. After doing this for both spar caps, he used a hand block plane to cut the blocking down to match the booms. Finally, he cut a 6"-wide sanding belt, glued the strip to a board and used this to sand the face of the spar smooth.
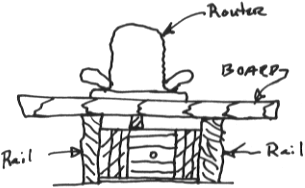
Other builders have done this by using a router mounted in a board. The tapered rails on each side of the spar boom are an inch or so higher than the finished thickness of the boom. The router is adjusted to the correct height and with the board resting on the rails, you move the router back and forth. It is slow, but very accurate.
To assemble the forward face skin, Norbert picked the spar up and set it on the braces for the upper boom. The skin was assembled on the table, but this time there was no need for shims under the wax paper. The plywood needn't be cut to the exact size since it is easily trimmed after installation with a router and a laminate trimmer bit.
![]()
To mark the internal structure of the spar on the forward face plywood, Norbert placed the plywood on the spar. He made a little strap-duplicator of plywood so that he could hook it under and mark the outside-there was also a certain amount of lifting-and-peeking.
To varnish the interior, you have the choice of transferring the lines already drawn on the outside and masking or using the sticky-side-up method with masking tape. What you do is lay some 3M Fine Line tape, sticky-side-up, across the spar at each brace and staple each end to the jig table-like the treatment given to poor Gulliver. Then run tape down the spar booms and wherever else needed for masking. When you have all of the tape needed for the masked edges, gently place the skin on the tape. Press it down and cut the ends off the stapled-down cross pieces.
The tricky part is getting the plywood on to the spar in the exact position you want without scrambling the delicate tape. Thus, you need some method of precisely locating the plywood on the spar, and some method of getting the plywood to the correct location just above the spar without touching the tape and then lowering the plywood when you are ready. Remember that you don't have to put tape over the entire spar boom at this time-just the edges to be masked. This should leave some area of the spar boom available for little blocks. (Any suggestions on the best method of doing this?)
To install the forward face plywood, the glue was applied to the skin and the hardener to the underlying structure. Just as with Karl Hansen's wing skinning method, the varnish was only brought about 1/4" from the underlying structure. Norbert used little sticks to prop up the ends of the plywood to prevent glue/catalyst contact until he had finished clamping and stapling in the center.
I have heard a certain amount of discussion regarding the required freshness of the Aerolite acid hardener. Some builders brush on more hardener if it is not dripping wet. I've heard claims that as long as you can smell the catalyst it will harden the glue, but I'd have to see a lot of tests before I put my faith in that! Norbert ran a number of tests, applying the hardener and then waiting one, two, three and four hours before applying the glue to the other surface and clamping. He found that he had good joints in the first two hours, but "almost nothing" in four hours.
He also found that the moisture content of the wood was important. With Aerolite, the hardener has a longer "open" life when the wood is dry-the opposite of what you would expect. Penacolite is the opposite, you get the poorest joints when the wood is very dry. He is using Penacolite for the fuselage frame laminations. Because his shop isn't warm enough, he has made a box, put an electric heater in the bottom. It gets up to about 120°F in the box and the Penacolite sets up in a couple of hours.
Norbert Kramer designed and built a line of sailboats but sold that business some years ago. He has used all of the resins-epoxies, polyesters, polyvinyl esters, etc.-and has been very impressed with both Aerolite and Penacolite. He has yet to make a bad joint in all of his test blocks, even using maple. As for epoxy, he says "it's the most over-rated bunch of (bleep) around" and is using it only for varnishing. He started construction of an RV-4 but quickly sold the project to an acquaintance after finding the plans riddled with errors. The thing he likes best about building the Falco so far is the accuracy of the plans.
|
|